Appendix A — Division B
Explanatory Material
A-1.1.2.1.(1) Objectives and Functional Statements Attributed to Acceptable Solutions
The objectives and functional statements attributed to each Code provision are
shown in Table 2.8.1.1. at the end of Division B.
Many provisions in Division B serve as modifiers of or pointers to other
provisions or serve other clarification or explanatory purposes. In most cases, no
objectives and functional statements have been attributed to such provisions, which
therefore do not appear in the above-mentioned table.
For provisions that serve as modifiers of or pointers to other referenced
provisions and that do not have any objectives and functional statements attributed
to them, the objectives and functional statements that should be used are those
attributed to the provisions they reference.
A-1.3.1.2.(1) Referenced Documents
Where documents are referenced in the Appendices of this Code, they shall be the
editions designated in Table A-1.3.1.2.(1)
| Table A-1.3.1.2.(1) Documents Referenced in the Appendices of  Book II (Plumbing Systems) of the British Columbia Building Code 2012 Book II (Plumbing Systems) of the British Columbia Building Code 2012 | |||
| Issuing Agency | Document Number(1) | Title of Document(2) | Code Reference |
| ASHRAE | 2009 | ASHRAE Handbook of Fundamentals | A-2.6.3.1.(2) |
| ASHRAE |
2011 | ASHRAE Handbook – HVAC Applications | A-2.6.3.1.(2) |
| ASME |
B16.3-2011 | Malleable-Iron Threaded Fittings, Classes 150 and 300 | Table A-2.2.5., 2.2.6. and 2.2.7. |
| ASME |
B16.4-2011 | Gray Iron Threaded Fittings, Classes 125 and 250 | Table A-2.2.5., 2.2.6. and 2.2.7. |
| ASME |
B16.15-2011 | Cast Copper Alloy Threaded Fittings, Classes 125 and 250 | Table A-2.2.5., 2.2.6. and 2.2.7. |
| ASME |
B16.18-2012 | Cast Copper Alloy Solder-Joint Pressure Fittings | Table A-2.2.5., 2.2.6. and 2.2.7. |
| ASME | B16.22-2001 | Wrought Copper and Copper Alloy Solder Joint Pressure Fittings | Table A-2.2.5., 2.2.6. and 2.2.7. |
| ASME |
B16.23-2011 | Cast Copper Alloy Solder Joint Drainage Fittings: DWV | Table A-2.2.5., 2.2.6. and 2.2.7. |
| ASME | B16.29-2007 | Wrought Copper and Wrought Copper Alloy Solder Joint Drainage Fittings – DWV | Table A-2.2.5., 2.2.6. and 2.2.7. |
| ASPE |
2010 | ASPE Plumbing Engineering Design Handbook | Appendix A |
| ASPE | 2008 | Data Book – Volume 4, Chapter 8, Grease Interceptors | A-2.4.4.3.(1) |
| ASTM |
A 53/A 53M-10 | Pipe, Steel, Black and Hot-Dipped, Zinc-Coated, Welded and Seamless | Table A-2.2.5., 2.2.6. and 2.2.7. |
| ASTM |
A 269-10 | Seamless and Welded Austenitic Stainless Steel Tubing for General Service | Table A-2.2.5., 2.2.6. and 2.2.7. |
| ASTM |
A 312-11 | Seamless, Welded, and Heavily Cold Worked Austenitic Stainless Steel Pipes | Table A-2.2.5., 2.2.6. and 2.2.7. |
| ASTM |
B 42-10 | Seamless Copper Pipe, Standard Sizes | Table A-2.2.5., 2.2.6. and 2.2.7. |
| ASTM |
B 43-09 | Seamless Red Brass Pipe, Standard Sizes | Table A-2.2.5., 2.2.6. and 2.2.7. |
| ASTM |
B 88-09 | Seamless Copper Water Tube | Table A-2.2.5., 2.2.6. and 2.2.7. |
| ASTM |
B 306-09 | Copper Drainage Tube (DWV) | Table A-2.2.5., 2.2.6. and 2.2.7. |
| ASTM | D 2466-06 | Poly(Vinyl Chloride) (PVC) Plastic Pipe Fittings, Schedule 40 | Table A-2.2.5., 2.2.6. and 2.2.7. |
| ASTM | D 2467-06 | Poly(Vinyl Chloride) (PVC) Plastic Pipe Fittings, Schedule 80 | Table A-2.2.5., 2.2.6. and 2.2.7. |
| ASTM | D 3138-04 | Solvent Cements for Transition Joints Between Acrylonitrile-Butadiene-Styrene (ABS) and Poly(Vinyl Chloride) (PVC) Non-Pressure Piping Components | A-2.2.5.10. to 2.2.5.12. |
| ASTM | F 628-08 | Acrylonitrile-Butadiene-Styrene (ABS) Schedule 40 Plastic Drain, Waste, and Vent Pipe With a Cellular Core | Table A-2.2.5., 2.2.6. and 2.2.7. |
| ASTM |
F 714-10 | Polyethylene (PE) Plastic Pipe (SDR-PR) Based on Outside Diameter | Table A-2.2.5., 2.2.6. and 2.2.7. |
| AWWA | M14-2004 |
Recommended Practice for Backflow Prevention and Cross-Connection Control | Table A-2.6.2.4.(2) |
| AWWA |
ANSI/AWWA C151/A21.51-2009 | Ductile-Iron Pipe, Centrifugally Cast, for Water | Table A-2.2.5., 2.2.6. and 2.2.7. |
| BC | S.B.C. 2003, c. 53 | Environmental Management Act | A-2.7.4.1. |
| CCBFC | NRCC 35951 | Guidelines for Application of Part 3 of the National Building Code of Canada to Existing Buildings | A-1.1.1.1.(1) |
| CCBFC | NRCC 40383 | User’s Guide – NBC 1995, Fire Protection, Occupant Safety and Accessibility (Part 3) | A-1.1.1.1.(1) |
| CCBFC | NRCC 43963 | User’s Guide – NBC 1995, Application of Part 9 to Existing Buildings | A-1.1.1.1.(1) |
| CCBFC | NRCC 53301 | National Building Code of Canada 2010 | Table A-2.2.5., 2.2.6. and 2.2.7. A-2.4.10. A-2.4.10.4.(1) |
| CCBFC | NRCC 53543 | User’s Guide – NBC 2010, Structural Commentaries (Part 4 of Division B) | A-1.1.1.1.(1) |
| CGSB | CAN/CGSB-34.1-94 | Asbestos-Cement Pressure Pipe | Table A-2.2.5., 2.2.6. and 2.2.7. |
| CGSB | CAN/CGSB-34.9-94 | Asbestos-Cement Sewer Pipe | Table A-2.2.5., 2.2.6. and 2.2.7. |
| CGSB | CAN/CGSB-34.22-94 | Asbestos-Cement Drain Pipe | Table A-2.2.5., 2.2.6. and 2.2.7. |
| CGSB | CAN/CGSB-34.23-94 | Asbestos-Cement House Connection Sewer Pipe | Table A-2.2.5., 2.2.6. and 2.2.7. |
| CSA | A60.1-M1976 | Vitrified Clay Pipe | Table A-2.2.5., 2.2.6. and 2.2.7. |
| CSA |
CAN/CSA-A257.1-09 | Non-Reinforced Circular Concrete Culvert, Storm Drain, Sewer Pipe, and Fittings | Table A-2.2.5., 2.2.6. and 2.2.7. |
| CSA |
CAN/CSA-A257.2-09 | Reinforced Circular Concrete Culvert, Storm Drain, Sewer Pipe, and Fittings | Table A-2.2.5., 2.2.6. and 2.2.7. |
| CSA |
B64.4.1-11 | Reduced Pressure Principle Backflow Preventers for Fire Protection Systems (RPF) | Table A-2.6.2.4.(2) |
| CSA |
B64.5.1-11 | Double Check Valve Backflow Preventers for Fire Protection Systems (DCVAF) | Table A-2.6.2.4.(2) |
| CSA |
B64.6.1-11 | Dual Check Valve Backflow Preventers for Fire Protection Systems (DuCF) | Table A-2.6.2.4.(2) |
| CSA |
B64.9-11 | Single Check Valve Backflow Preventers for Fire Protection Systems (SCVAF) | Table A-2.6.2.4.(2) |
| CSA |
B64.10.1-11 | Maintenance and Field Testing of Backflow Preventers | A-2.6.2.1.(3) |
| CSA |
B70-12 | Cast Iron Soil Pipe, Fittings, and Means of Joining | Table A-2.2.5., 2.2.6. and 2.2.7. |
| CSA |
B125.3-12 | Plumbing Fittings | A-2.6.1.11.(1) |
| CSA | CAN/CSA-B127.1-99 |
Asbestos Cement Drain, Waste and Vent Pipe and Pipe Fittings | Table A-2.2.5., 2.2.6. and 2.2.7. |
| CSA | B127.2-M1977 | Components for Use in Asbestos Cement Building Sewer Systems | Table A-2.2.5., 2.2.6. and 2.2.7. |
| CSA |
CAN/CSA-B137.1-09 | Polyethylene (PE) Pipe, Tubing, and Fittings for Cold-Water Pressure Services | Table A-2.2.5., 2.2.6. and 2.2.7. |
| CSA |
CAN/CSA-B137.2-09 | Polyvinylchloride (PVC) Injection-Moulded Gasketed Fittings for Pressure Applications | Table A-2.2.5., 2.2.6. and 2.2.7. |
| CSA |
CAN/CSA-B137.3-09 | Rigid Polyvinylchloride (PVC) Pipe and Fittings for Pressure Applications | Table A-2.2.5., 2.2.6. and 2.2.7. |
| CSA |
CAN/CSA-B137.5-09 | Crosslinked Polyethylene (PEX) Tubing Systems for Pressure Applications | Table A-2.2.5., 2.2.6. and 2.2.7. A-2.2.5.7.(1) |
| CSA |
CAN/CSA-B137.6-09 | Chlorinated Polyvinylchloride (CPVC) Pipe, Tubing, and Fittings for Hot- and Cold-Water Distribution Systems | Table A-2.2.5., 2.2.6. and 2.2.7. A-2.2.5.10. to 2.2.5.12. |
| CSA |
CAN/CSA-B137.9-09 | Polyethylene/Aluminum/Polyethylene (PE-AL-PE) Composite Pressure-Pipe Systems | Table A-2.2.5., 2.2.6. and 2.2.7. A-2.2.5.13.(1) |
| CSA |
CAN/CSA-B137.10-09 | Crosslinked Polyethylene/Aluminum/Crosslinked Polyethylene (PEX-AL-PEX) Composite Pressure-Pipe Systems | Table A-2.2.5., 2.2.6. and 2.2.7. A-2.2.5.14.(1) |
| CSA |
CAN/CSA-B137.11-09 | Polypropylene (PP-R) Pipe and Fittings for Pressure Applications | Table A-2.2.5., 2.2.6. and 2.2.7. A-2.2.5.15.(1) |
| CSA |
CAN/CSA-B181.1-11 | Acrylonitrile-Butadiene-Styrene (ABS) Drain, Waste, and Vent Pipe and Pipe Fittings | Table A-2.2.5., 2.2.6. and 2.2.7. A-2.2.5.10. to 2.2.5.12. |
| CSA |
CAN/CSA-B181.2-11 | Polyvinylchloride (PVC) and Chlorinated Polyvinylchloride (CPVC) Drain, Waste, and Vent Pipe and Pipe Fittings | Table A-2.2.5., 2.2.6. and 2.2.7. A-2.2.5.10. to 2.2.5.12. |
| CSA |
CAN/CSA-B181.3-11 | Polyolefin and Polyvinylidene Fluoride (PVDF) Laboratory Drainage Systems | Table A-2.2.5., 2.2.6. and 2.2.7. |
| CSA |
CAN/CSA-B182.1-11 | Plastic Drain and Sewer Pipe and Pipe Fittings | Table A-2.2.5., 2.2.6. and 2.2.7. |
| CSA |
CAN/CSA-B182.2-11 | PSM Type Polyvinylchloride (PVC) Sewer Pipe and Fittings | Table A-2.2.5., 2.2.6. and 2.2.7. |
| CSA |
CAN/CSA-B182.4-11 | Profile Polyvinylchloride (PVC) Sewer Pipe and Fittings | Table A-2.2.5., 2.2.6. and 2.2.7. |
| CSA |
CAN/CSA-B182.6-11 | Profile Polyethylene (PE) Sewer Pipe and Fittings For Leak-Proof Sewer Applications | Table A-2.2.5., 2.2.6. and 2.2.7. |
| CSA | CAN/CSA-G401-07 | Corrugated Steel Pipe Products | Table A-2.2.5., 2.2.6. and 2.2.7. |
| McGraw-Hill | 2006 | International Plumbing Codes Handbook | A-2.6.3. |
| NIST | Building Materials and Structures Report BMS-79, 1941 | Water-Distributing Systems for Buildings | A-2.6.3. |

A-2.1.2.1.(2) Combined Building Drains
Combined building drains may have proven acceptable on the basis of past
performance in some localities and their acceptance under this Code may be
warranted.
A-2.1.2.4.(1) Service Piping
The layout as shown in Figure A-2.1.2.4.(1)(c) may require special legal arrangements in some jurisdictions to ensure that access can be provided to
all parts of the service pipes.
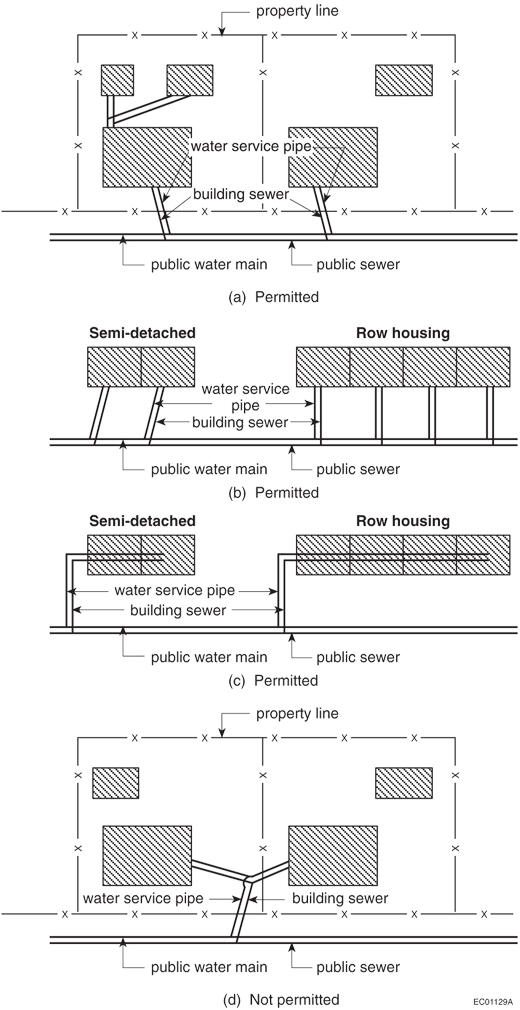
Figure A-2.1.2.4.(1)
Service Piping
A-2.2.2.3.(3) Shower Drainage (Plan View)
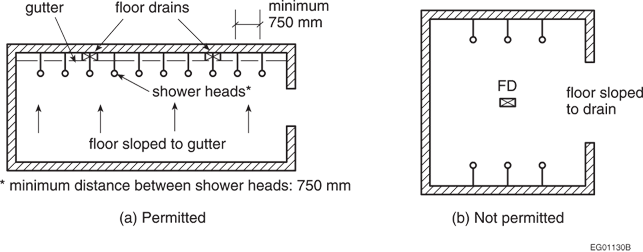
Figure A-2.2.2.3.(3)
Shower Drainage (Plan View)
A-2.2.2.4.(1) Concealed Overflows
This does not preclude the use of a standing waste.
A-2.2.3.1.(1) and (3) Trap Seal Depth and Trap Connections
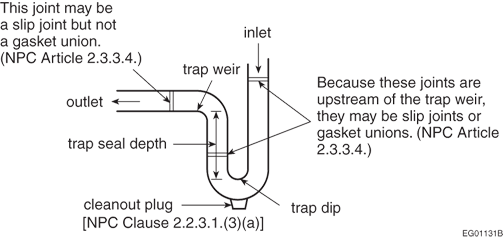
Figure A-2.2.3.1.(1) and (3)
Trap Seal Depth and Trap Connections
A-2.2.3.1.(4) Prohibited Traps
Except for an S-trap standard, the S-trap shown in Figure A-2.2.3.1.(4)(b) is prohibited by Clause 2.5.6.3.(1)(b), which limits the fall on fixture drains. Crown vented traps shown in Figure A-2.2.3.1.(4)(c) are prohibited by Clause 2.5.6.3.(1)(a), which requires that the distance from the trap weir to the vent be not less than twice the size of the
fixture drain.
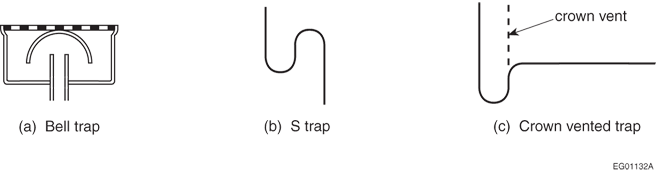
Figure A-2.2.3.1.(4)
Prohibited Traps
A-2.2.4.1. T Fittings in Drainage Systems
The use of a cross fitting in a drainage system is prohibited, but such fitting
may be used in a venting system to connect 4 vent pipes. In a drainage system, a T
fitting can only be used as shown in Figure A-2.2.4.1.(a), and cannot be used as shown in Figure A-2.2.4.1.(b) because the T or cross fitting would change the direction of flow in the drainage system.
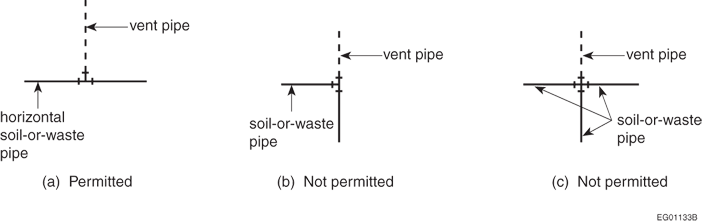
Figure A-2.2.4.1.
T Fittings in Drainage Systems
A-2.2.4.2. Sanitary T Fittings in Drainage Systems
A sanitary T fitting may be used to change the direction of flow in a drainage
system from horizontal to vertical, but may not be used to change the direction of
flow in a nominally horizontal drainage system. A combination Y and 1/8th bend
fitting may also be used as shown in Figure A-2.2.4.2.(b).
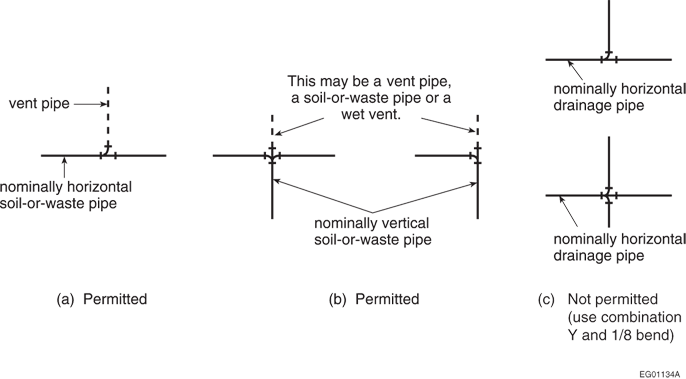
Figure A-2.2.4.2.
Sanitary T Fittings in Drainage Systems
A-2.2.5., 2.2.6. and 2.2.7. Pipe and Fitting Applications
| Table A-2.2.5., 2.2.6. and 2.2.7. Summary of Pipe and Fitting Applications Forming part of Appendix Note A-2.2.5., 2.2.6. and 2.2.7. | |||||||||||
| Types of Piping and Fittings | Standard References | Code References |
Use of Piping and Fittings(1) | ||||||||
| Drainage System | Venting System | Potable Water System | |||||||||
| Above-ground inside building | Under-ground under building | Building sewer | Above-ground | Under-ground | Above-ground | Underground | |||||
| Cold | Hot | Under building | Outside building | ||||||||
| Asbestos-cement DWV pipe | |||||||||||
| Type I Class 3 000, sizes 8-in. to 24-in. | 2.2.5.1.(1) | P | P | P | P | P | N | N | N | N | |
| Type II Class 4 000, sizes 3-in. to 24-in. | 2.2.5.1.(1) | P | P | P | P | P | N | N | N | N | |
| Asbestos-cement sewer pipe (non-pressure) | |||||||||||
| Classes 1 500, 2 400, 3 000, sizes 4-in., 5-in., 6-in. |
or CSA B127.2-M |
2.2.5.1.(2) | N | P | P | N | P | N | N | N | N |
| Classes 1 500, 2 400, 3 300, 4 000, 5 000, 6 000, 7 000, sizes 8-in. to 42.2-in. | 2.2.5.1.(2) | N | P | P | N | P | N | N | N | N | |
| Asbestos-cement water pipe | |||||||||||
| Class 100 psi | 2.2.5.2. | N | N | N | N | N | N | N |
P(2) |
P(2) |
|
| Class 150 psi | |||||||||||
| Class 200 psi | |||||||||||
| Concrete sewer pipe | CSA Series A257 | ||||||||||
| Sewer, storm drain and culvert |
CAN/CSA-A257.1 |
2.2.5.3. | N |
P(3) |
P | N | N | N | N | N | N |
| Reinforced culvert, storm drain and sewer |
CAN/CSA-A257.2 |
2.2.5.3. | N |
P(3) |
P | N | N | N | N | N | N |
| Vitrified clay pipe | 2.2.5.4. | N | P | P | N | P | N | N | N | N | |
| Polyethylene water pipe and tubing | |||||||||||
| Series 160 sizes with compression fittings |
CAN/CSA-B137.1 |
2.2.5.5. | N | N | N | N | N | N | N |
P(4) |
P(4) |
| Series 50, 75, 100 and 125 | 2.2.5.5. | N | N | N | N | N | N | N | N | N | |
| Polyethylene (PE) plastic pipe (SDR-PR) based on outside diameter |
ASTM F 714 |
N |
P |
P |
N |
P |
N |
N |
N |
N |
|
| Polyvinyl chloride (PVC) pressure fittings |
CAN/CSA-B137.2 |
2.2.5.8. | N | N | N | N | N | N | P | P | |
| Polyvinyl chloride (PVC) water pipe | |||||||||||
| Dimension ratios (DR) or standard dimension ratios (SDR) 14, 17, 18, 21, 25 and 26 |
CAN/CSA-B137.3 |
2.2.5.8. | N | N | N | N | N | P | N |
P(7) |
P(7) |
| Schedule 40 in sizes from ½ inch to 2½ inches inclusively | |||||||||||
| Schedule 80 in sizes from ½ inch to 6 inches inclusively | |||||||||||
| PVC fittings, Schedule 40 |
N |
N |
N |
N |
N |
N |
N |
N |
|||
| PVC fittings, Schedule 80 |
N |
N |
N |
N |
N |
N |
P |
P |
|||
| Crosslinked polyethylene (PEX) pressure tubing |
CAN/CSA-B137.5 |
2.2.5.7. | N | N | N | N | N | P | P | ||
| Chlorinated polyvinyl chloride (CPVC) water pipe |
CAN/CSA-B137.6 |
2.2.5.9. | N | N | N | N | N |
P(8) |
P(8) |
||
| Polyethylene/Aluminum/ Polyethylene (PE/AL/PE) pressure pipe |
CAN/CSA-B137.9 |
2.2.5.13. | N | N | N | N | N | N | P | P | |
| Crosslinked Polyethylene/Aluminum/ Crosslinked Polyethylene (PEX/AL/PEX) pressure pipe |
CAN/CSA-B137.10 |
2.2.5.14. | N | N | N | N | N | P | P | ||
| Polypropylene (PP-R) pressure pipe |
CAN/CSA-B137.11 |
2.2.5.15. | N | N | N | N | N | P | P | ||
| Plastic sewer pipe PS ≥ 320 kPa |
CAN/CSA-B182.1 |
2.2.5.10. | N | P | P | N | N | N | N | N | N |
| Acrylonitrile-butadiene-styrene (ABS) DWV pipe |
CAN/CSA-B181.1 |
2.2.5.10. | P | P | P | N | N | N | N | ||
| 2.2.5.11. | |||||||||||
| ABS Schedule 40 DWV pipe with a cellular core |
P |
P |
P |
N |
N |
N |
N |
||||
| Polyvinyl chloride (PVC) DWV pipe |
CAN/CSA-B181.2 |
2.2.5.10. | P | P | P | N | N | N | N | ||
| 2.2.5.11. | |||||||||||
| PVC sewer pipe (PSM type) ≤ 35-SDR | 2.2.5.10. | N | P | P | N | P | N | N | N | N | |
| Profile polyvinyl chloride (PVC) sewer pipe PS ≥ 320 kPa |
CAN/CSA-B182.4 |
2.2.5.10.(1)(f) | N | P | P | N | P | N | N | N | N |
| Profile polyethylene sewer pipe PS ≥ 320 kPa |
CAN/CSA-B182.6 |
2.2.5.10.(1)(g) | N | P | P | N | P | N | N | N | N |
| Polyolefin laboratory drainage systems |
CAN/CSA-B181.3 |
2.2.8.1. | P | P | P | N | N | N | N | ||
| Cast-iron soil pipe |
CSA B70 |
2.2.6.1. | P | P | P | P | P | N | N | N | N |
| Cast-iron water pipe |
ANSI/AWWA C151/A21.51 (Ductile iron) |
2.2.6.4. | P | P | P | P | P | P | P | P | P |
| Cast-iron screwed fittings |
ASME B16.4 (Cast iron) |
2.2.6.5. | N | N | N | N | N | P | P | P | P |
|
ASME B16.3 (Malleable iron) |
2.2.6.6. | N | N | N | N | N | P | P | P | P | |
| Stainless steel pipe | 2.2.6.10. | P | P | P | P | P | P | P | P | P | |
| Stainless steel tube | 2.2.6.14. | N | N | N | N | N | P | P | P | P | |
| Welded and seamless steel galvanized pipe |
ASTM A 53/A 53M |
2.2.6.7. | P | N | N | P | N |
P(9) |
P(9) |
P(9) |
P(9) |
| Corrugated steel galvanized pipe | 2.2.6.8. | N | N |
P(10) |
N | N | N | N | N | N | |
|
Sheet metal pipe(11) |
— | 2.2.6.9. | N | N | N | N | N | N | N | N | N |
| Copper and brass pipe |
ASTM B 42 (Copper) |
2.2.7.1. | P | P | P | P | P | P | P | P | P |
|
ASTM B 43 (Red brass) |
2.2.7.1. | P | P | P | P | P | P | P | P | P | |
| Brass or bronze threaded water fittings |
ASME B16.15 |
2.2.7.3. | N | N | N | N | N | P | P | P | P |
| Copper tube | |||||||||||
| Types K and L hard temper |
ASTM B 88 |
2.2.7.4. | P | P | P | P | P | P | P | N | N |
| Types K and L soft temper |
ASTM B 88 |
2.2.7.4. | N | N | N | N | N | P | P | P | P |
| Type M hard temper |
ASTM B 88 |
2.2.7.4. | P | N | N | P | N | N | N | N | N |
| Type M soft temper |
ASTM B 88 |
2.2.7.4. | N | N | N | N | N | N | N | N | N |
| Type DWV |
ASTM B 306 |
2.2.7.4. |
P(12) |
N | N |
P(12) |
N | N | N | N | N |
| Solder-joint drainage fittings |
ASME B16.23 |
2.2.7.5. | P | P | P | P | P | N | N | N | N |
| Solder-joint water fittings |
ASME B16.18 |
2.2.7.6. | N | N | N | P | P | P | P | P | P |
| Lead waste pipe | — | 2.2.7.8. | P | N | P | N | N | N | N | ||
| N = Not permitted P = Permitted | |||||||||||
| Notes to Table A-2.2.5., 2.2.6. and 2.2.7.: | |
|
|
|
| (1) | Where fire stops are pierced by pipes, the integrity of the fire stop must be maintained. |
| (2) | Cold water only. |
| (3) | Gasketted joints required. |
| (4) | Permitted only for water service pipe. |
| (5) | Combustible piping in noncombustible construction is subject to the requirements of
Sentence 3.1.5.16.(1) of Division B of Book I (General) of this Code. |
| (6) | Combustible piping that penetrates a fire separation is subject to the requirements
in Articles 3.1.9.1.,9.10.9.6. and 9.10.9.7. of Division B of Book I (General) of this Code. |
| (7) | Not permitted in hot water systems. |
| (8) | Not to exceed design temperature and design pressure stated in Sentence 2.2.5.9.(2). |
| (9) | Permitted only in buildings of industrial occupancy as described in Book I (General) of this Code, or for the repair of existing galvanized steel piping systems. |
| (10) | Permitted underground only in a storm drainage system. |
| (11) | Permitted only for an external leader. |
| (12) | Not permitted for the fixture drain or vent below the flood level rim of a flush-valve-operated urinal. |
A-2.2.5.3.(3) Concrete Fittings
Concrete fittings fabricated on the site from lengths of pipe may have proven
acceptable on the basis of past performance in some localities and their acceptance
under this Code may be warranted.
A-2.2.5.6.(1) Polyethylene Pipe Used Underground
Joints within the high-density polyethylene pipe (HDPE) shall
be heat-fused according to the manufacturer's instructions. Joints
between HDPE pipes and other materials shall be made with a suitable
hubless coupling.
A-2.2.5.7.(1) Crosslinked Polyethylene Pipe and Fittings
There are some special installation requirements
for the use of crosslinked polyethylene pipe and its associated fittings.
Reference should, therefore, be made to the installation information
in CAN/CSA-B137.5, “Crosslinked Polyethylene (PEX) Tubing Systems for Pressure Applications.”
A-2.2.5.10. to 2.2.5.12. Solvent Cement
The CSA standards CAN/CSA-B137.6, “Chlorinated Polyvinylchloride (CPVC) Pipe, Tubing, and Fittings for
Hot- and Cold-Water Distribution Systems,”CAN/CSA-B181.1, “Acrylonitrile-Butadiene-Styrene (ABS) Drain, Waste, and Vent Pipe
and Pipe Fittings,” and CAN/CSA-B181.2, “Polyvinylchloride (PVC) and Chlorinated Polyvinylchloride (CPVC)
Drain, Waste, and Vent Pipe and Pipe Fittings,” reference ASTM standard D 3138, “Solvent Cements for Transition Joints Between Acrylonitrile-Butadiene-Styrene (ABS) and Poly(Vinyl Chloride) (PVC) Non-Pressure Piping Components,” which specifies the colour of the solvent cement. PVC cement shall be grey, ABS
cement shall be yellow, CPVC cement shall be clear and transition cement shall be
white. The standard colour allows Code users to readily determine if the correct
solvent cement has been used. It should be noted that a transition cement is not an
all-purpose cement.
A-2.2.5.13.(1) Polyethylene/Aluminum/Polyethylene Composite Pipe and Fittings
There are some special installation
requirements for the use of polyethylene/aluminum/polyethylene composite
pipe and fittings. Reference should, therefore, be made to the installation
information in CAN/CSA-B137.9, “Polyethylene/Aluminum/Polyethylene (PE-AL-PE) Composite Pressure-Pipe
Systems.”
A-2.2.5.14.(1) Crosslinked Polyethylene/Aluminum/Crosslinked Polyethylene Composite Pressure Pipe and Fittings
There
are some special installation requirements for the use of crosslinked
polyethylene/aluminum/crosslinked polyethylene composite pipe and
fittings. Reference should, therefore, be made to the installation
information in CAN/CSA-B137.10, “Crosslinked Polyethylene/Aluminum/Crosslinked Polyethylene (PEX-AL-PEX)
Composite Pressure-Pipe Systems.”
A-2.2.5.15.(1) Polypropylene Pipe and Fittings
There are some special installation requirements for the use
of polypropylene pipe and fittings. Reference should, therefore, be
made to the installation information in CAN/CSA-B137.11, “Polypropylene (PP-R) Pipe and Fittings for Pressure Applications.”
A-2.2.6.7.(3) Galvanized Steel Pipe
The use of galvanized steel pipe and fittings in a water distribution system may
have proven acceptable on the basis of past performance in some localities and its
acceptance under this Code may be warranted.
A-2.2.10.5.(1) Saddle Hubs or Fittings
Saddle hubs or fittings may have proven acceptable on the basis of past
performance in some localities and their acceptance under this Code may be
warranted.
A-2.2.10.7. Hot Water TemperatureHot water delivered at 60°C will severely burn human skin in 1 to 5 seconds. At 49°C, the time for a full thickness scald burn to occur is
10 minutes. Children, the elderly and persons with disabilities are particularly at risk of
scald burns. Compliance with Article 2.2.10.7. will reduce the risk of scalding in showers and bathtubs, and reduce the risk of thermal shock from wall-mounted shower heads.
These requirements apply to all occupancies, not just residential occupancies.
The water outlet temperature at other fixtures, such as lavatories, sinks, laundry
trays or bidets, is not addressed by Article 2.2.10.7., but a scald risk may exist at such fixtures nonetheless.
A-2.2.10.9.(3) Bubblers
Bubblers installed on other than drinking fountains may have proven acceptable on
the basis of past performance in some localities and their acceptance under this
Code may be warranted.
A-2.2.10.16.(1) Air Admittance Valve
An air admittance valve is a device that is closed by gravity and seals the vent
terminal at zero differential pressure (no flow conditions) and under positive
internal pressures. The valve allows air to enter the drainage system without the
use of a vent extended to outside air and prevents trap siphonage.
trap siphonage. The material of the diaphragm can be damaged by exposure to acidic or corrosive
fumes in the ambient atmosphere; therefore, air admittance valves should not be
installed in locations where there is a potential for exposure to such fumes.
A-2.3.2.6.(1) Mechanical Joints
Storm sewer blockage can cause mechanical joints at the base of leaders
to fail, which results in flooding. The failure occurs because the
cleanout joints at the base of the rainwater leaders are not able
to withstand the water column pressure. To avoid such failures, it
is necessary to ensure that storm water systems installed using mechanical
joints be braced and/or restrained at the ends of branches, changes
in direction and elevation, at dead ends and at other locations as
required by the manufacturer to prevent the separation of joints due
to internal pressure, mechanical stress or seismic events. Care should
be taken to replace cleanouts properly after maintenance or testing.
A-2.3.3.9. Linear Expansion
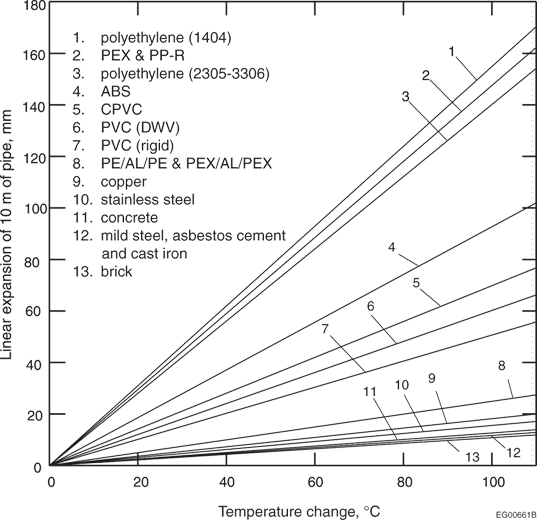
Figure A-2.3.3.9.
Linear Expansion
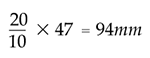
Example: To determine the expansion of 20 m of ABS pipe for a
temperature change from 10°C to 60°C.
- Temperature change = 60 – 10 = 50°C,
- Enter the chart at 50°C, read up to ABS line, and then across to the mm scale = 47 mm/10 m of pipe,
- ∴ change in length of 20 m of pipe =
A-2.3.3.9.(1) Expansion and Contraction
Expansion and contraction in piping systems may be accommodated in a number of
ways including, but not limited to, piping design and layout, material selection,
and the inclusion of expansion joints.
A-2.3.3.11.(2) Air Break
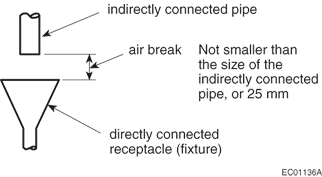
Figure A-2.3.3.11.(2)
Air Break
A-2.3.4.6.(1) Support for Underground Piping
See explanation for Subsection 2.3.5. for additional protection
required for underground pipes. Permitted installations are shown in Figure A-2.3.4.6.(1)(a). The methods of support shown in Figure A-2.3.4.6.(1)(b) are not permitted because the base does not provide firm and continuous support for the pipe.
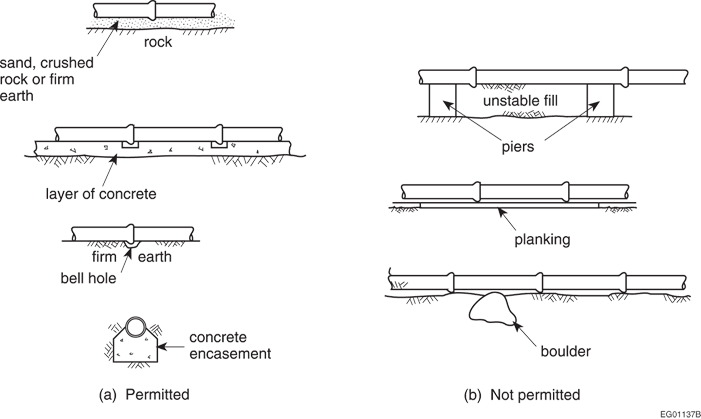
Figure A-2.3.4.6.(1)
Support for Underground Piping
A-2.3.5.1.(1) Backfilling of Pipe Trench
Stronger pipes may be required in deep fill or under driveways, parking lots,
etc., and compaction for the full depth of the trench may be necessary.
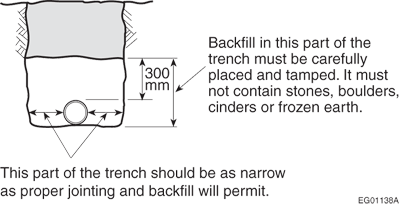
Figure A-2.3.5.1.(1)
Backfilling of Pipe Trench
A-2.3.5.2.(1) Protection of Underground Non-Metallic Pipes
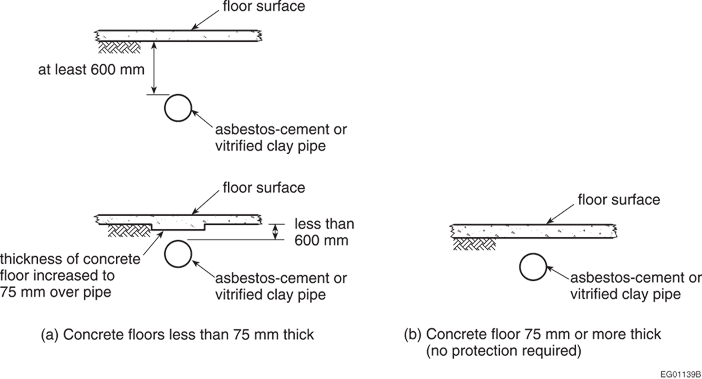
Figure A-2.3.5.2.(1)
Protection of Underground Non-Metallic Pipes
A-2.3.7.2.(2) Pressure-Testing of Potable Water Systems
The plastic piping manufacturer should be consulted
to determine the appropriateness of using air to pressure-test the
piping system.
A-2.4.2.1.(1)(a)(ii) and (e)(vi) Indirect Connections
See Sentence 2.4.5.1.(4) for trapping requirements for indirectly connected fixtures.
See Sentence 2.4.7.1.(9) for cleanouts on drip pipes for food receptacles or display cases.
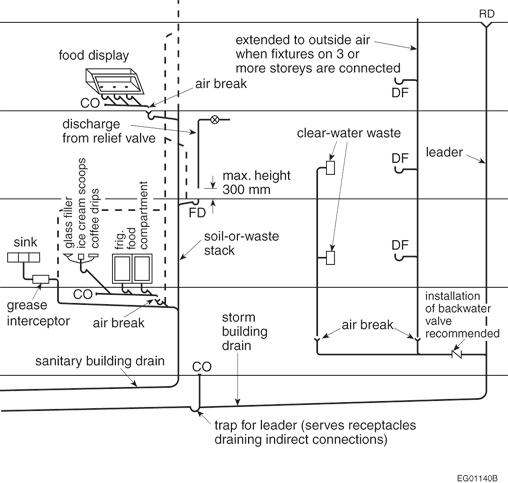
Figure A-2.4.2.1.(1)(a)(ii) and (e)(vi)
Indirect Connections
A-2.4.2.1.(2) Soil-or-Waste Pipe Connections
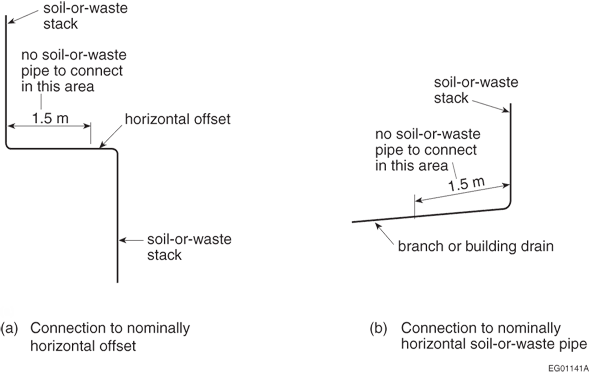
Figure A-2.4.2.1.(2)
Soil-or-Waste Pipe Connections
A-2.4.2.1.(4) Suds Pressure Zones
High sudsing detergents used in clothes washers produce suds that tend to disrupt
the venting action of venting systems and can also spread through the lower portions
of multi-storey drainage systems. The more turbulence, the greater the suds. One
solution that avoids the creation of suds pressure zones involves connecting the
suds-producing stack downstream of all other stacks and increasing the size of the
horizontal building drain to achieve a greater flow of air and water. Using
streamlined fittings, such as wyes, tends to reduce suds formation. Check valves or
backwater valves in fixture outlet pipes have also been used to correct problem
installations.
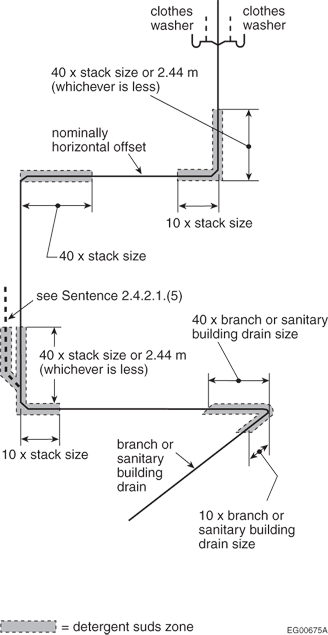
Figure A-2.4.2.1.(4)
Suds pressure zones
A-2.4.3.3.(1) Waste with Organic Solids
Equipment such as garbage grinders and potato peelers produces
waste with organic solids. These devices reduce most waste into small-sized
particles that will flow easily through the drainage system. However,
if they are located upstream of the interceptor, the particles could
block the interceptor.
A-2.4.4.3.(1) Grease Interceptors
Grease interceptors may be required when it is considered that the
discharge of fats, oil or grease may impair the drainage system. Information
on the design and sizing of grease interceptors can be found in ASPE 2008, “Data Book – Volume 4, Chapter 8, Grease Interceptors.”
A-2.4.4.4.(1) Bio-hazardous Waste
Chemically loaded and bio-hazardous wastes can be dangerous to private or public
sewer systems and hazardous to people. The treatment of corrosive and acid waste is
mandated by this Code. The treatment of chemically loaded effluents is usually
regulated by sewage collecting and treatment authorities. The treatment of
bio-hazardous waste should follow “good engineering practice,” such as that
described in Laboratory Biosafety Guidelines published by Health Canada. It should
be noted that bio-hazardous waste disposal systems require specific engineering
expertise and remain outside the scope of this Code.
A-2.4.5.1.(2) Trapping of Sinks and Laundry Trays

Figure A-2.4.5.1.(2)
Trapping of Sinks and Laundry Trays
Notes to Figure A-2.4.5.1.(2):
|
|
|
| (1) |
See Sentence 2.4.9.3.(2).
|
| (2) |
The developed length of the fixture outlet pipe shall not exceed
1 200 mm. See Article 2.4.8.2. |
A-2.4.5.1.(3) Single Traps for Fixture Groups
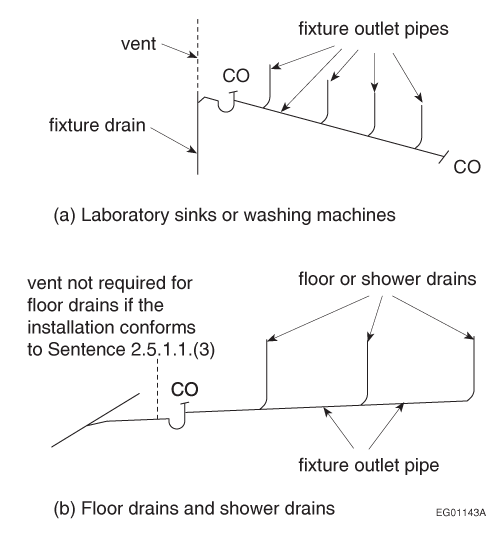
Figure A-2.4.5.1.(3)
Single Traps for Fixture Groups
A-2.4.5.1.(5) Location of Trap or Interceptor
An interceptor that replaces a trap must be vented in the same way as the trap it
replaces. (See A-2.4.2.1.(1)(a)(ii) and (e)(vi).) Where an interceptor other than an oil interceptor serves a group of fixtures requiring
more than one trap, each fixture must be properly trapped and vented. (See Article 2.5.5.2. for venting of oil interceptors.)
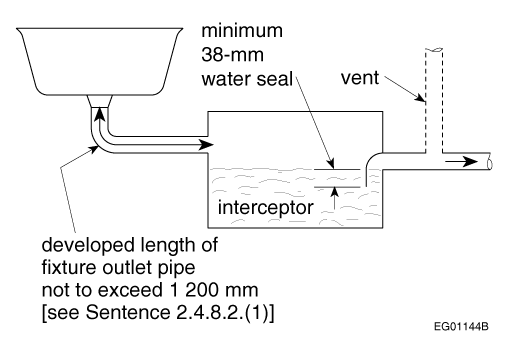
Figure A-2.4.5.1.(5)
Location of Trap or Interceptor
A-2.4.5.2.(1) Untrapped Leader
When an untrapped leader drains to a combined building sewer, clearance
requirements are the same as for vent terminals. (See also A-2.5.6.5.(4).)
A-2.4.5.3.(1) Subsoil Drainage Connections
This Code does not regulate the installation of subsoil drainage pipes, but does
regulate the connection of such pipes to the plumbing system. The intent of this
Article is to place a trap between the subsoil drainage pipe and the sanitary
drainage system. The cleanout must be installed in accordance with Sentence 2.4.7.1.(2). A trap or sump may be provided specifically for the subsoil drains, or advantage may be taken of the trap of a floor drain or storm
water sump as shown in Figure A-2.4.5.3.(1).
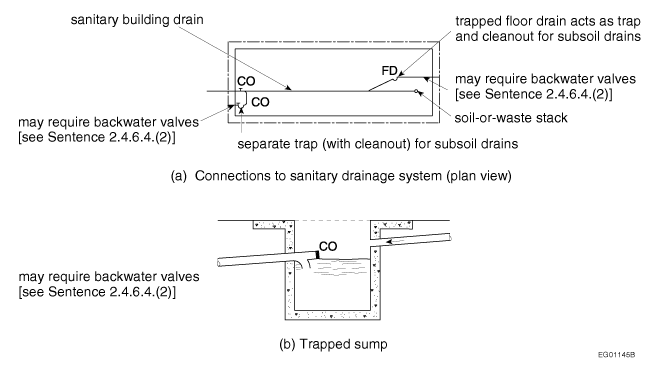
Figure A-2.4.5.3.(1)
Subsoil Drainage Connections
A-2.4.5.4.(1) Location of Building Traps
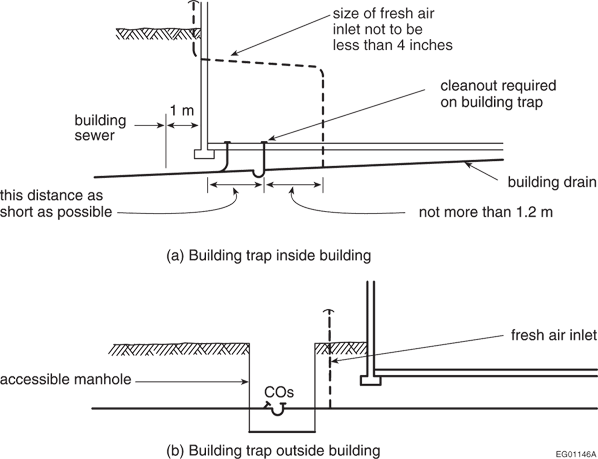
Figure A-2.4.5.4.(1)
Location of Building Traps
A-2.4.5.5.(1) Maintaining Trap Seals
Periodic manual replenishment of the water in a trap is considered to be an
equally effective means of maintaining the trap seal in floor drains in residences.
Under pressure differential conditions, special measures are necessary to maintain
trap seals.
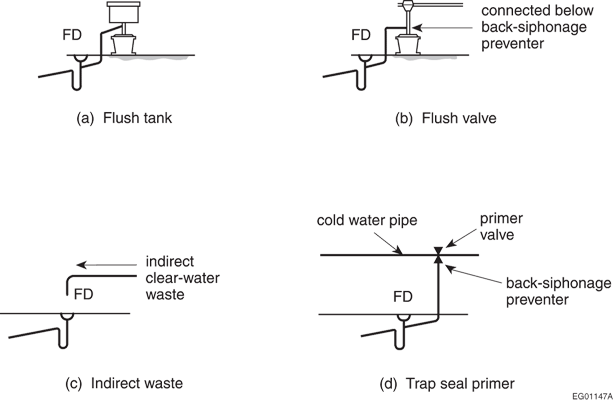
Figure A-2.4.5.5.(1)
Maintaining Trap Seals
A-2.4.6.3. Arrangement of Piping at Sump
In most installations, controls will be installed in conjunction with a float to
automatically empty the sump. If such controls are not provided, the capacity of the
sump should equal the maximum inflow to the sump that is expected to occur during
any 24 h period.
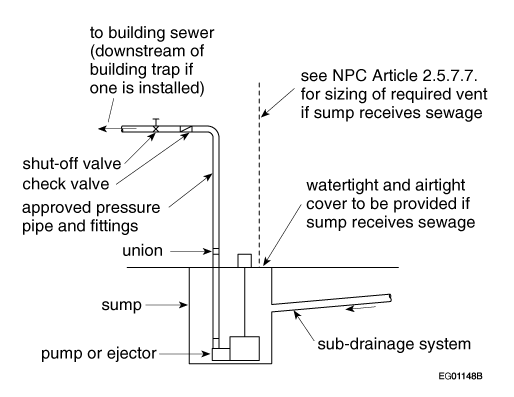
Figure A-2.4.6.3.
Arrangement of Piping at Sump
A-2.4.6.4.(1) Backwater Valve or Gate Valve
The installation of a backwater valve or a gate valve in a building drain or in a
building sewer may have proven acceptable on the basis of past performance in some
localities, and their acceptance under this Code may be warranted.
A-2.4.6.4.(6) Protection from Backflow Caused by Surcharge
These requirements are intended to apply when in the opinion of the authority
having jurisdiction there is danger of backup from a public sewer.
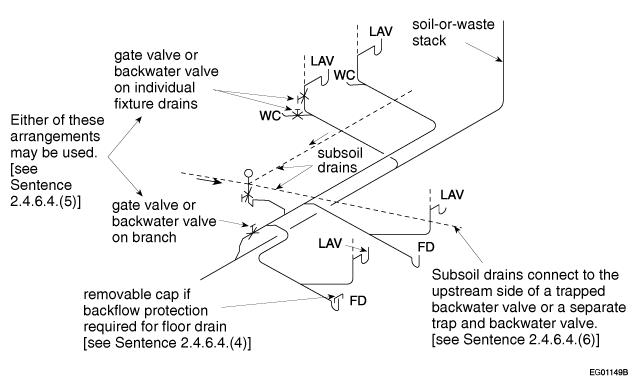
Figure A-2.4.6.4.(6)
Protection from Backflow Caused by Surcharge
A-2.4.7.1.(1) Cleanouts for Fixture Drains
A trap cleanout plug is not acceptable as a cleanout for the
fixture drain; hence, either a separate cleanout or a trap with a
removable trap dip must be installed.
A-2.4.7.1.(6) Cleanouts for Drainage Systems
To accommodate the limitations of sewer cleaning equipment,
the cleanout should be located as close as possible to the exterior
wall of the building, either inside or outside, and be accessible
for sewer cleaning equipment.
A-2.4.7.1.(9) Cleanouts for Food Receptacle Drip Pipes
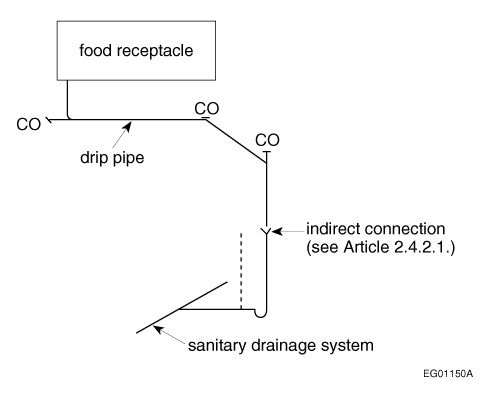
Figure A-2.4.7.1.(9)
Cleanouts for Food Receptacle Drip Pipes
A-2.4.8.1.(1) Minimum SlopeAlthough
slopes below 1 in 100 are permitted for pipes over 4 inches, they should be used only where necessary. Steeper
slopes and higher velocities will help to keep pipes clean by moving
heavier solids that might tend to clog the pipes.
A-2.4.8.2.(1) Island Fixture Installation
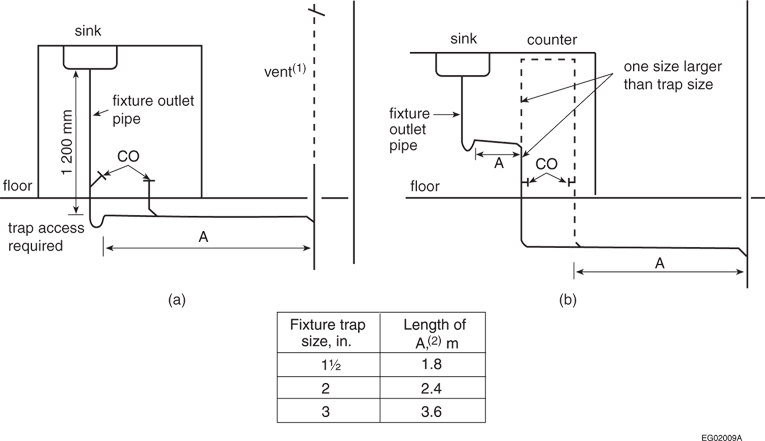
Figure A-2.4.8.2.(1)
Island Fixture Installation(3)
Notes to Figure A-2.4.8.2.(1):
|
|
|
| (1) |
Vent size to be in accordance with Article 2.5.6.3. |
| (2) |
Length of A depends on trap size. Fall cannot exceed size.
|
| (3) |
See also Article 2.5.1.1. |
A-Table 2.4.9.3. Hydraulic Loads for Laundry Traps and Floor Drains
When determining the hydraulic
load on a pipe, no allowance need be made for a load from a domestic
clothes washer when discharged to a laundry tray since the hydraulic
load from the laundry tray is sufficient. Also no hydraulic load is
required from a floor drain in a washroom since it is for emergency
use only.
A-2.4.9.3.(2) Continuous Wastes
Fixture outlet pipes that are common to 2 or 3 compartments or fixtures
are sometimes referred to as continuous wastes and are not considered
to be branches. (See also A-2.4.5.1.(2).)
A-2.4.9.3.(3) Standpipe Illustration
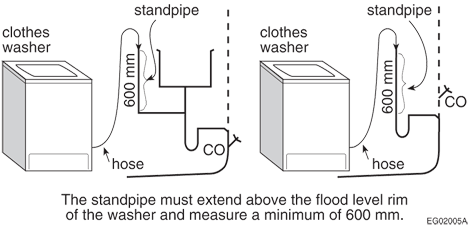
Figure A-2.4.9.3.(3)
Standpipe Installation for Clothes Washers
A-2.4.10. Determination of Hydraulic Loads and Drainage Pipe Sizes
Hydraulic Loads
The hydraulic load that is imposed by a fixture is represented by a factor
called a fixture unit. Fixture units are dimensionless and take into account the
rate of discharge, time of discharge and frequency of discharge of the
fixture.
Confusion often arises when attempts are made to convert fixture units to
litres per second because there is no straightforward relationship between the
two. The proportion of the total number of fixtures that can be expected to
discharge simultaneously in a large system is smaller than in a small system.
For example, doubling the number of fixtures in a system will not double the
peak flow that the system must carry, although of course the flow will be
increased somewhat. Figure A-2.4.10. shows the relationship that
was used in constructing the tables of capacities of stacks, branches, sanitary
building drains and sanitary building sewers (Tables 2.4.10.6.A to 2.4.10.6.C).
Although the curve in Figure A-2.4.10. was used to prepare the
Code tables, it was not included in Book II (Plumbing Systems) of the British Columbia Building Code. Instead, a single approximate conversion factor is given in the Code so that a continuous
flow from a fixture may be converted from litres per second to fixture units in
order to determine the total hydraulic load on the sanitary drainage system. The
conversion factor, which is given in Sentence 2.4.10.3.(1), is 31.7 fixture units per litres per second. The discharge from a continuous flow fixture in litres per second when multiplied by
31.7 gives the hydraulic load in fixture units, and that load is added to the
fixture unit load from other fixtures to give the total load that the sanitary
drainage pipe must carry.
Book II (Plumbing Systems) of the British Columbia Building Code. Instead, a single approximate conversion factor is given in the Code so that a continuous
flow from a fixture may be converted from litres per second to fixture units in
order to determine the total hydraulic load on the sanitary drainage system. The
conversion factor, which is given in Sentence 2.4.10.3.(1), is 31.7 fixture units per litres per second. The discharge from a continuous flow fixture in litres per second when multiplied by
31.7 gives the hydraulic load in fixture units, and that load is added to the
fixture unit load from other fixtures to give the total load that the sanitary
drainage pipe must carry.
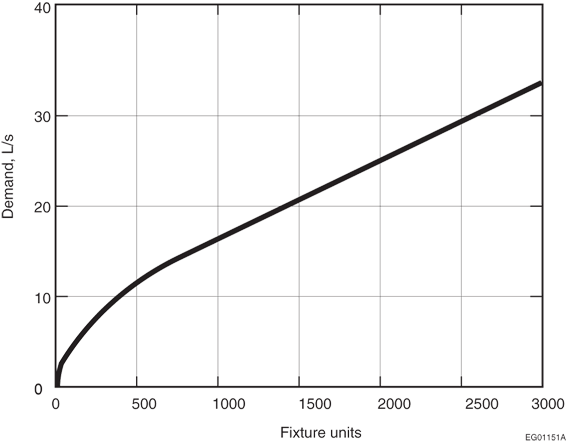
Figure A-2.4.10.-A-A
Relationship between Fixture Units and Demand
The hydraulic load that is produced by storm water runoff depends both on the
size of the area that is drained and local rainfall intensity. The capacities of
storm drainage pipes and combined sewers in Tables 2.4.10.9., 2.4.10.10. and 2.4.10.11. have been expressed in terms of the number of litres that they can carry when the local rainfall
intensity is 1 mm in 15 min. The hydraulic load for a
particular location is obtained by simply multiplying the rainfall intensity
figure given in Appendix C of Division B of Book I (General) of this Code by the actual area drained as specified in Sentence 2.4.10.4.(1).
Book I (General) of this Code by the actual area drained as specified in Sentence 2.4.10.4.(1). In the case of restricted-flow drains, the hydraulic load from storm water
runoff must be calculated using manufacturer discharge flow rates of specific
drains in the case of roofs, and water-flow restrictors in the case of paved
areas.
When plumbing fixtures are connected to a combined sewer, the hydraulic load
from the fixtures must be converted from fixture units to litres or, in the case
of continuous flow, from litres per second to litres so that these loads can be
added to the hydraulic loads from roofs and paved surfaces. As already pointed
out, the relationship between fixture units and litres per second and,
consequently, the relationship between fixture units and litres is not
straightforward, and an approximate conversion factor has been adopted. The
conversion factor given in Sentence 2.4.10.5.(1) is 9.1 L/fixture unit, except where the load is less than 260 fixture units in which case a round figure of
2 360 L is to be used. In the case of continuous-flow fixtures
that are connected to combined sewers or storm sewers, the conversion factor
given in Sentence 2.4.10.3.(2) is 900 L per L/s. This conversion factor is not an approximation but an exact
calculation.
The conversion factors given in Sentences 2.4.10.3.(1) and 2.4.10.5.(1) are designed to convert in one direction only, and must not be used to convert from fixture
units to litres per second in the one instance, nor from litres to fixture units
in the other instance.
In summary, it should be noted that
- in sanitary drainage systems, all hydraulic loads are converted to fixture units, and
- in storm drainage systems or combined drainage systems, all hydraulic loads are converted to litres.
Procedure for Selecting Pipe Sizes
The following is an outline, with examples, of the procedures to be followed
in determining the size of each section of drainage piping.
- Sanitary drainage pipes, such as
branches, stacks, building drains or building sewers:
- Determine the load in fixture units from all fixtures except continuous-flow fixtures;
- Determine the load in litres per second from all continuous-flow fixtures and multiply the number of litres per second by 31.7 to obtain the number of fixture units;
- Add loads (a) and (b) to obtain the total hydraulic load on the pipe in fixture units; and
- Consult the appropriate table
from Tables 2.4.10.6.A, 2.4.10.6.B or 2.4.10.6.C to select the pipe size.
(Note that no pipe size may be smaller than that permitted in Subsection 2.4.9.)
- Storm drainage pipes, such as gutters,
leaders, horizontal pipes, building drains or building sewers:
- Determine the area in square metres of roofs and paved surfaces according to Sentence 2.4.10.4.(1);
- Determine the local rainfall
intensity (15 min rainfall) from Appendix C of
Division B of Book I (General) of this Code;
- Multiply (a) by (b) to obtain the hydraulic load in litres;
- If a fixture discharges a continuous flow to the storm system, multiply its load in litres per second by 900 to obtain the hydraulic load in litres;
- If flow control roof drains are used, compute the discharge rate based on rain intensity, retention duration, accumulation height and roof area from the roof drain manufacturers' data;
- Add loads (c) or (e), and (d) to obtain the total hydraulic load on the pipe in litres; and
- Consult the appropriate table
from Tables 2.4.10.9., 2.4.10.10. or 2.4.10.11. to select the pipe or gutter size.
(Note that no pipe may be smaller than that permitted in Subsection 2.4.9.)
- Combined drainage pipes, such as
building sewers:
- Determine the total load in fixture units from all fixtures except continuous-flow fixtures;
- If the fixture unit load exceeds 260, multiply it by 9.1 to determine the equivalent hydraulic load in litres. If the fixture unit load is 260 or fewer fixture units, the hydraulic load is 2 360 L;
- Obtain the hydraulic load from roofs and paved surfaces in the same manner as for storm drains (see 2(a), (b), (c) and (e));
- Obtain the hydraulic load in litres from any continuous-flow source that is connected to the sanitary or storm drainage system in the same manner as for storm drainage pipes (see 2(d));
- Add hydraulic loads (b), (c) and (d) to obtain the total hydraulic load on the pipe in litres; and
- Consult Table 2.4.10.9. to select the pipe size.
(Note that no pipe may be smaller than that permitted in Subsection 2.4.9.)
Examples
Example 1: Determination of the size of storm drainage components for the
building shown in Figures A-2.4.10.-B and A-2.4.10.-C
Step No. 1: Determine the hydraulic load from the roofs.
Area drained by gutter= 162 m2
Area drained by roof drain= 230.4 m2
If the local rainfall intensity is 25 mm:
the load on the gutter
(leader No. 2) is (25 × 162)= 4 050 L
the load on the roof drain
(leader No. 1) is (25 × 230.4)= 5 760 L
If the local rainfall intensity is 15 mm:
the load on the gutter
(leader No. 2) is (15 × 162)= 2 430 L
the load on the roof drain
(leader No. 1) is (15 × 230.4)= 3 456 L
Step No. 2: Determine the size of storm drainage components.
Using the appropriate hydraulic loads, the size of storm drainage
components can be determined from Tables 2.4.10.9., 2.4.10.10. and 2.4.10.11. These values are tabulated in Table A-2.4.10. for rainfall intensities of 25 mm and 15 mm in 15 min.
Figure A-2.4.10.-A
Storm Drainage Areas (Example 1)
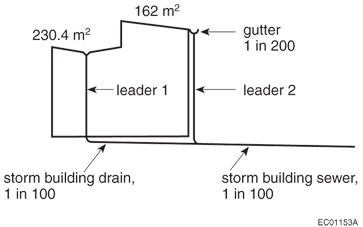
Figure A-2.4.10.-B
Storm Drainage Components (Example 1) (Elevation View)
| Table A-2.4.10. Storm Drainage Pipe Sizes (Example 1) Forming part of Appendix Note A-2.4.10. | ||||||
|
Area Drained, m2 |
15-min Rainfall Intensity, mm |
Code Reference Table No. |
||||
| 25 | 15 | |||||
| Hydraulic Load, L | Size, inches | Hydraulic Load, L | Size, inches | |||
| Roof drain leader | 230.4 | 5 760 | 4 | 3 456 | 3 | 2.4.10.11. |
| Gutter | 162 | 4 050 | 8 | 2 430 | 7 | 2.4.10.10. |
| Gutter leader | 162 | 4 050 | 3 | 2 430 | 2½ | 2.4.10.11. |
| Storm building drain | 230.4 | 5 760 | 5 | 3 456 | 4 | 2.4.10.9. |
| Storm building sewer | 395.8 | 9 895 | 6 | 5 936 | 5 | 2.4.10.9. |
Example 2: Determination of the size of drainage pipes for
buildings
Figure A-2.4.10. represents an office
building with washrooms for men and women, a drinking fountain and cleaner's
closet on each typical floor. The equipment room with facilities is located
in the basement. The building is 18 m by 30 m and
is to be built where the rainfall intensity is 28 mm in 15 minutes.
where the rainfall intensity is 28 mm in 15 minutes. - Hydraulic Load per Typical Floor
5 WC @ 6= 30 fixture units2 UR @ 1½= 3 fixture units4 LAV @ 1½= 6 fixture units2 FD @ 3= 6 fixture units1 FS @ 3= 3 fixture units1 DF @ 1= 1 fixture unit49 fixture unitsThe reader is left to calculate the size of the branches, one of which must be 4 inches and another 3 inches (see Subsection 2.4.9.). Therefore the smallest part of the stack must be 4 inches.
- Hydraulic Load on Stack
5 storeys @ 49 fixture units = 245 fixture unitsTable 2.4.10.6.A permits 4-inch pipe. Use 4-inch pipe.
- Hydraulic Load on Basement Branch
1 WC @ 6= 6 fixture units1 LAV @ 1= 1 fixture unit2 FD @ 3= 6 fixture units1 FS @ 3= 3 fixture unitsSemi-continuous Flow0.23 L/s × 31.7= 7 fixture units23 fixture unitsTable 2.4.10.6.B permits 3-inch pipe. Use 3-inch pipe.
- Hydraulic Load on Building Drain
From soil-or-waste stack245 fixture unitsFrom basement branch 23 fixture units268 fixture unitsReferring to Table 2.4.10.6.C, at a slope of 1 in 50, a 4-inch pipe will carry 240 fixture units.Referring to Table 2.4.10.6.C, at a slope of 1 in 25, a 4-inch pipe will carry 300 fixture units.For practical reasons, use a 4-inch pipe at a slope of not less than 1 in 32.
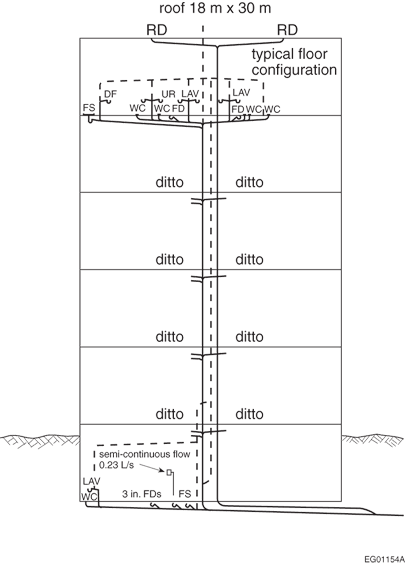 Figure A-2.4.10.-ABuilding Drainage System (Example 2)
 - Storm Load
Area of roof 18 × 30 = 540 m 2Rainfall intensity can be obtained from Appendix C of Division B ofBook I (General) of this Code, and in this example it is 28 mm in 15
min
Total hydraulic storm load = 28 × 540 = 15 120 LStorm load on each roof drain = 15 120/2 = 7 560 L
- Size of Horizontal Leaders
Referring to Table 2.4.10.9., at a slope of 1 in 25, a 4-inch pipe will carry a load of 8 430 L.Referring to Table 2.4.10.9., at a slope of 1 in 100, a 5-inch pipe will carry a load of 7 650 L.Referring to Table 2.4.10.9., at a slope of 1 in 133, a 6-inch pipe will carry a load of 10 700 L.Therefore, use a 5-inch pipe at a slope of 1 in 100.
- Size of Vertical Leader
Table 2.4.10.11. would permit a 5-inch pipe (19 500 L) but this size is not readily available. For practical reasons, use a 6-inch pipe.
- Size of Storm Building Drains
Since a drainage pipe cannot be any smaller than any upstream pipes, the storm building drain must be at least 6 inches. Referring again to Table 2.4.10.9., a 6-inch pipe will carry a hydraulic load of 17 600 L at a slope of 1 in 50. Therefore use a 6-inch pipe at a slightly higher slope.
- Size of Combined Building Sewer
- Total sanitary load excluding semi-continuous flow 260 fixture units converted to litres (Clause 2.4.10.5.(1)(b)) × 9.1 = 2 366 L
- Semi-continuous flow 0.23 L/s converted to litres (Sentence 2.4.10.3.(2)) × 900 = 207 L
- Storm load 15 120
L
Total hydraulic load 17 693 L
Referring to Table 2.4.10.9., at a slope of 1 in 50, a 6-inch pipe will carry 17 600 L.Referring to Table 2.4.10.9., at a slope of 1 in 25, a 6-inch pipe will carry 24 900 L.Therefore, use a 6-inch pipe at a slope of not less than 1 in 32.
A-2.4.10.4.(1) Rainfall Intensities
Climate information on rainfall intensities for various cities can be found in
Appendix C of Division B of Book I (General) of this Code.
Book I (General) of this Code. When calculating the hydraulic load from a roof or paved surface, it should be
noted that a 1 mm depth of water on 1 m2 of
surface is equivalent to 1 L.
A-2.5.1.1.(3) Trapping of Floor Drains
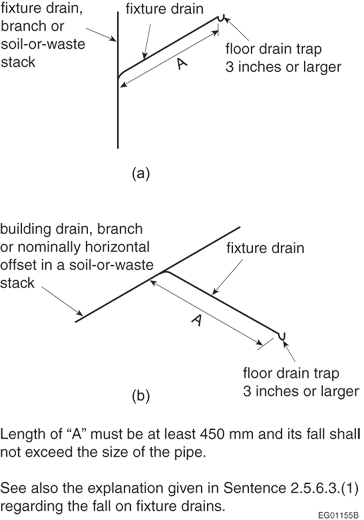
Figure A-2.5.1.1.(3)
Trapping of Floor Drains
A-2.5.1.1.(4) Venting not Required
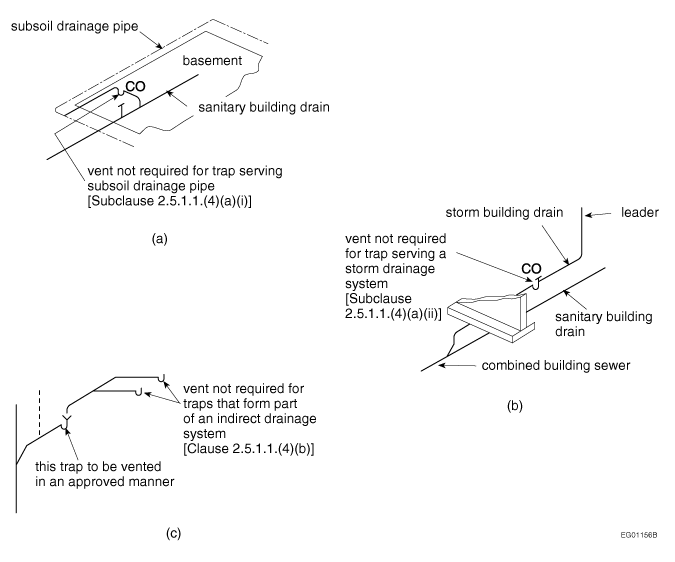
Figure A-2.5.1.1.(4)
Venting not Required
A-2.5.2.1. Wet Venting
Single-storey and multi-storey wet venting has been replaced with wet venting
(Article 2.5.2.1.) and circuit venting (Article 2.5.3.1.).
The information and figures presented in this Appendix Note are examples of the
most common installation practices that meet requirements of Book II (Plumbing Systems) of this Code . However, the examples shown do not preclude other installations that would also conform to
those requirements.
of Book II (Plumbing Systems) of this Code . However, the examples shown do not preclude other installations that would also conform to
those requirements. 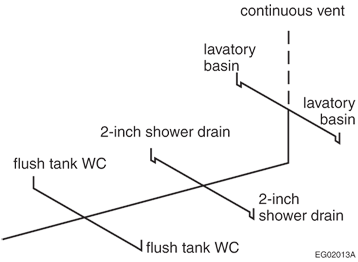
Figure A-2.5.2.1.-A
Example of Wet Venting Described in Clause 2.5.2.1.(1)(b)
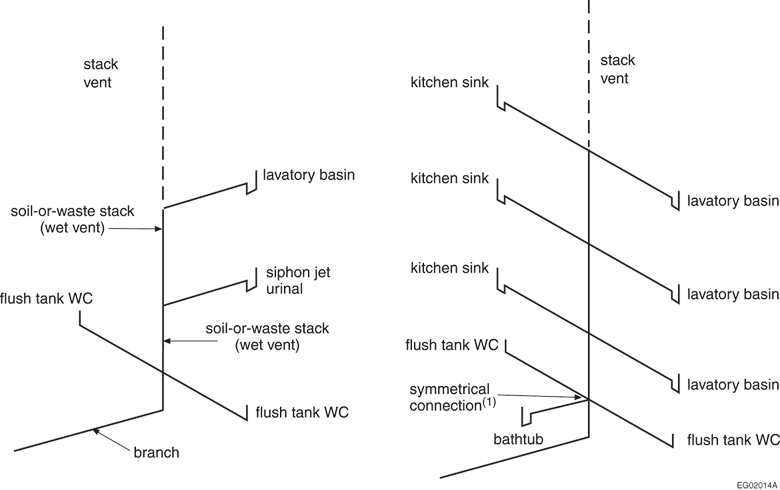
Figure A-2.5.2.1.-B
Example of Wet Venting Described in Clause 2.5.2.1.(1)(c)
Notes to Figure A-2.5.2.1.-B:
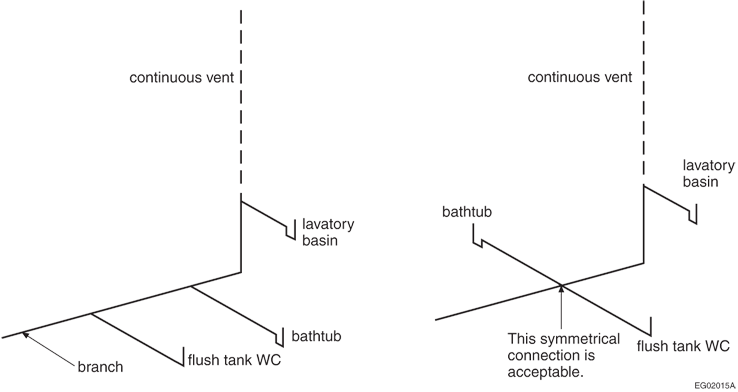
Figure A-2.5.2.1.-C
Example of Wet Venting Described in Clause 2.5.2.1.(1)(d)
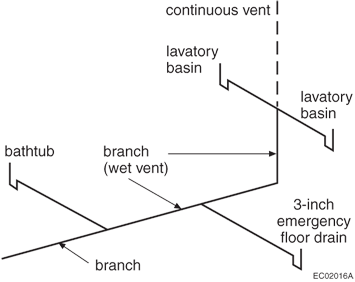
Figure A-2.5.2.1.-D
Example of Wet Venting Described in Clause 2.5.2.1.(1)(e)
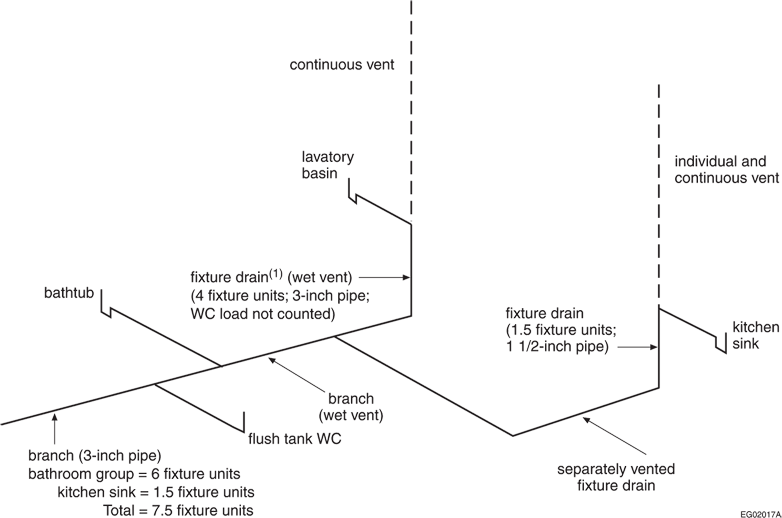
Figure A-2.5.2.1.-E
Example of Wet Venting Described in Clause 2.5.2.1.(1)(f)
Notes to Figure A-2.5.2.1.-E:

Figure A-2.5.2.1.-F
Example of Wet Venting Described in Clause 2.5.2.1.(1)(f)
Notes to Figure A-2.5.2.1.-F:
Figure A-2.5.2.1.-G
Example of Wet Venting Described in Clause 2.5.2.1.(1)(f)
Notes to Figure A-2.5.2.1.-G:
Figure A-2.5.2.1.-H
Example of Wet Venting Described in Clause 2.5.2.1.(1)(g)
Notes to Figure A-2.5.2.1.-H:
Figure A-2.5.2.1.-I
Example of Wet Venting Described in Clause 2.5.2.1.(1)(i)
Notes to Figure A-2.5.2.1.-I:
Figure A-2.5.2.1.-J
Example of Wet Venting Described in Subclause 2.5.2.1.(1)(i)(i)
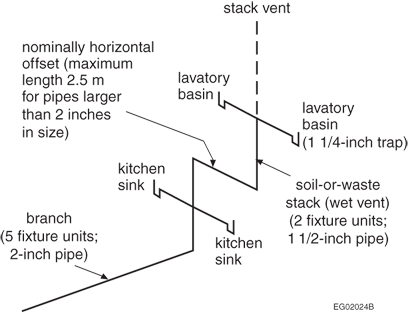
Figure A-2.5.2.1.-K
Example of Wet Venting Described in Subclause 2.5.2.1.(1)(i)(ii)
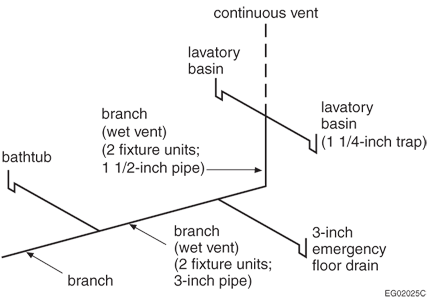
Figure A-2.5.2.1.-L
Example of Wet Venting Described in Clause 2.5.2.1.(1)(j)
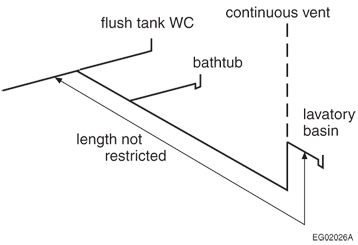
Figure A-2.5.2.1.-M
Example of Wet Venting Described in Clause 2.5.2.1.(1)(k)
A-2.5.3.1. Circuit Venting
Single-storey and multi-storey wet venting has been replaced with wet venting
(Article 2.5.2.1.) and circuit venting (Article 2.5.3.1.).
The information and figures presented in this Appendix Note are examples of the
most common installation practices that meet the requirements of Book II (Plumbing Systems) of this Code. However, the examples shown do not preclude other installations that would also
conform to those requirements.
the requirements of Book II (Plumbing Systems) of this Code. However, the examples shown do not preclude other installations that would also
conform to those requirements.
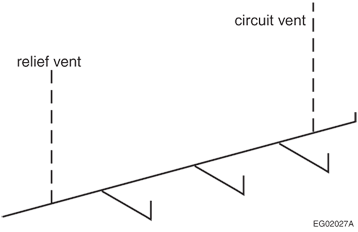
Figure A-2.5.3.1.-A
Example of Circuit Venting Described in Sentence 2.5.3.1.(1)

Figure A-2.5.3.1.-C
Example of Circuit Venting Described in Sentence 2.5.3.1.(2), which refers to fixture outlet pipe size
which refers to fixture outlet pipe size

Figure A-2.5.3.1.-F
Example of Circuit Venting Described in Sentence 2.5.3.1.(5)
Notes to Figure A-2.5.3.1.-F:

Figure A-2.5.3.1.-I
Example of Circuit Venting Described in Sentence 2.5.3.1.(7)
Notes to Figure A-2.5.3.1.-I:
|
|
|
| (1) |
Size as per Article 2.5.7.1. and Sentence 2.5.7.3.(1).
|
| (2) |
See Sentence 2.5.3.1.(7).
|
Figure A-2.5.3.1.-K
Example of Circuit Venting Described in Sentence 2.5.3.1.(9)
Notes to Figure A-2.5.3.1.-K:
Figure A-2.5.3.1.-L
Example of Circuit Venting Described in Sentence 2.5.3.1.(10)
Notes to Figure A-2.5.3.1.-L:
|
|
|
| (1) |
The relief vent and the additional circuit vent are one size smaller
than the circuit vent.
|
| (2) |
See Sentence 2.5.7.3.(1).
|

Figure A-2.5.3.1.-M
Example of Circuit Venting Described in Sentence 2.5.3.1.(11)
Notes to Figure A-2.5.3.1.-M:
A-2.5.4.3. Yoke Vent
(Note: In some other Provincial jurisdictions, yoke vents have
traditionally been referred to as modified stack vents.)
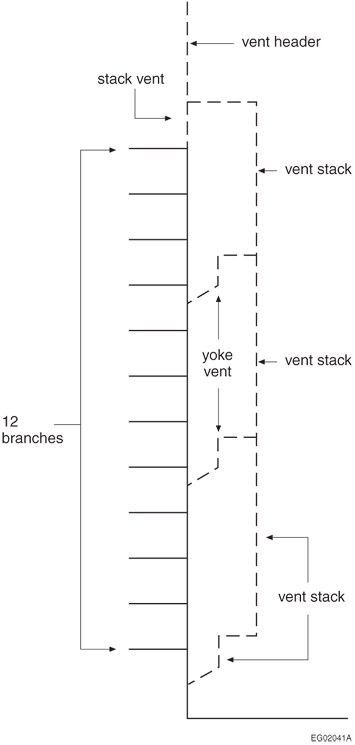
Figure A-2.5.4.3.
Yoke Vent
A-2.5.4.4.(1) Offset Relief Vents
When an offset is greater than 1.5 m, it must be sized the same way
as a branch or building drain (see Sentence 2.4.10.6.(2)). An offset relief vent is required at points A and B or A and C in Figure A-2.5.4.4.(1).
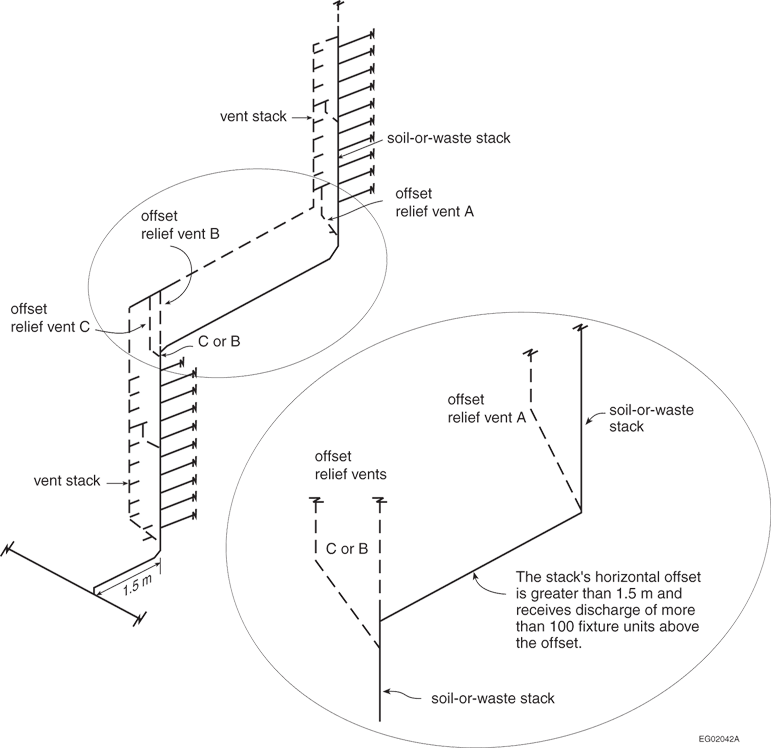
Figure A-2.5.4.4.(1)
Offset Relief Vents
A-2.5.4.5.(1) Fixture Connections to Vent Pipes
When one or more fixture drains are connected to a vent pipe,
the vent pipe becomes a wet vent. It must then conform to all the
requirements that can apply to it as a drainage pipe and a vent pipe.
A-2.5.5.2. Venting of Oil Interceptors

Figure A-2.5.5.2.
Venting of Oil Interceptors
A-2.5.6.2.(2) Vent Pipe Connections
Fittings used to connect vent pipes to nominally horizontal soil-or-waste pipes
are specified in Subsection 2.2.4.

Figure A-2.5.6.2.(2)
Vent Pipe Connections
A-2.5.6.3.(1) Vent Connection and Location of Vent Pipes
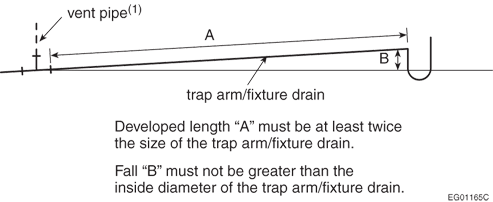
Figure A-2.5.6.3.(1)-A
Vent Connection
Notes to Figure A-2.5.6.3.(1)-A:
|
|
|
| (1) |
The vent pipe must be connected in accordance with Article 2.5.6.2. |
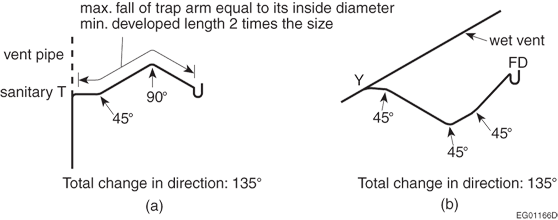
Figure A-2.5.6.3.(1)-B
Location of Vent Pipes That Protect Fixture Traps and Maximum Change in Direction
of Trap Arms
A-2.5.6.3.(2) Location of Vent Pipes
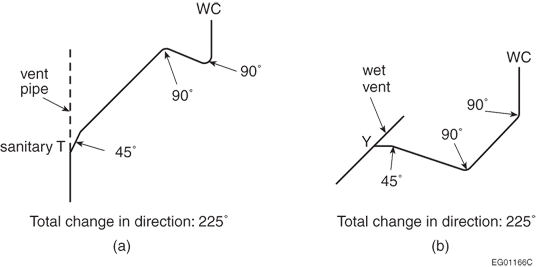
Figure A-2.5.6.3.(2)
Location of Vent Pipes and Maximum Change in Direction of Trap Arms for Fixtures
That Depend on Siphonic Action
A-2.5.6.3.(3) Length of WC Fixture Drain
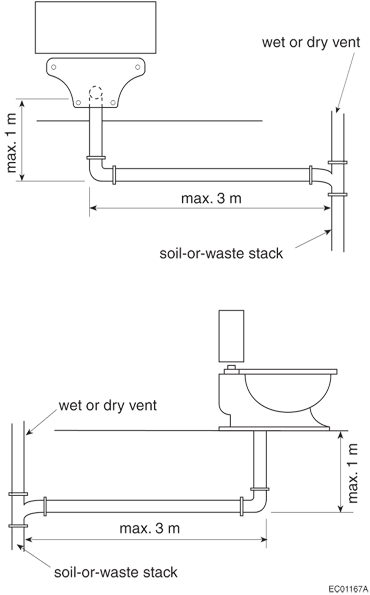
Figure A-2.5.6.3.(3)
Length of WC Fixture Drain
Notes to Figure A-2.5.6.3.(3):
A-2.5.6.5.(4) Vent Terminals
No vent pipe other than a fresh air inlet may terminate within the limits
indicated.
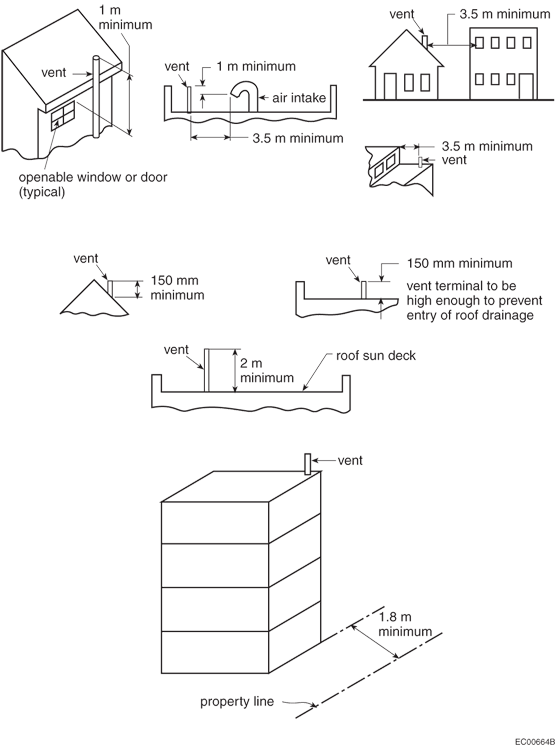
Figure A-2.5.6.5.(4)
Vent Terminals
A-2.5.8. Sizing of Venting Systems
Vent pipes are connected to the drainage system and terminate outside the
building. They allow air to enter and circulate and they protect the trap seals in
the drainage system. Except as permitted in Subsection 2.5.1., a
trap shall always be protected by a vent pipe.
Sizing of Vent Pipes
The sizes stated in Table 2.5.7.1. take precedence over all other venting tables.
Sizing of Relief Vents
Length is not taken into consideration when sizing a relief vent and an additional
circuit vent. A relief vent connected to a circuit-vented branch is sized according
to Sentences 2.5.7.3.(1) and (2).
An offset relief vent is sized according to Sentence 2.5.7.4.(1), which permits the offset relief vent to be one size smaller than the stack vent.
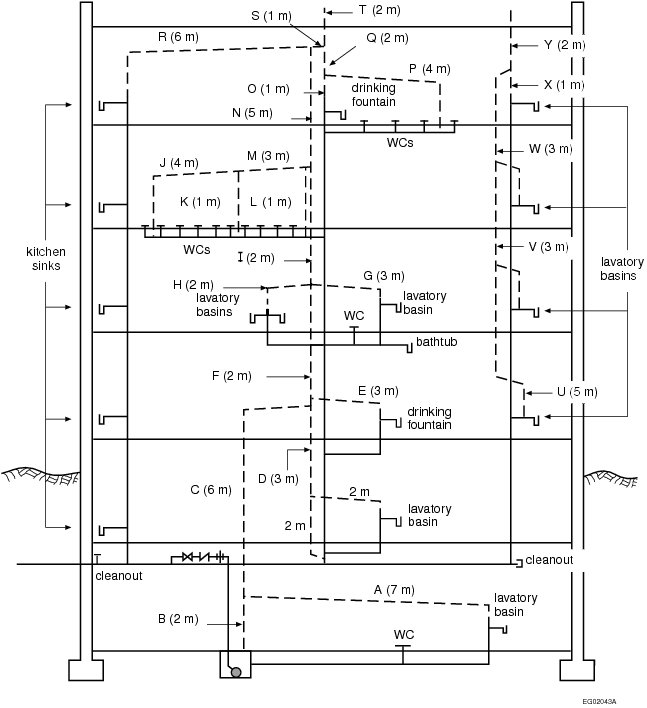
Figure A-2.5.8.
Sizing of a Venting System
Notes to Figure A-2.5.8.:
|
|
|
| (1) |
All water closets are 4 fixture units each.
|
| (2) |
The letters in columns 1 and 3 of Table A-2.5.8. correspond to the letters in this Figure.
|
| Table A-2.5.8. Sizing of Venting Systems Forming part of Appendix Note A-2.5.8. | |||||
| Vent Pipe(1) | Vent Name | Developed Length Used to Determine Size, m(1) | Hydraulic Load Used to Determine Size, fixture units | Code Reference | Minimum Size, inches |
| A | Continuous vent | A+C=13 | 5 | 2.5.7.1. | 1½ |
| B | Sump vent | n/a | n/a | 2.5.7.7.(1) | 2 |
| C | Branch vent | A+C=13 | 5 | 2.5.7.7.(2) | 2 |
| D | Vent stack | 2+D+F+I+N+S+T=17 | 66 | 2.5.7.1. 2.5.7.2. | 3 |
| E | Individual and continuous vent | n/a | n/a | 2.5.7.1. | 1¼ |
| F | Vent stack | Same as D=17 | 71 | Same as D | 3 |
| G | Continuous vent | G=3 | 6 | 2.5.8.3.(5) 2.5.7.1. | 1½ |
| H | Dual and continuous vent | n/a | n/a | 2.5.7.1. | 1¼ |
| I | Vent stack | Same as D=17 | 71 | Same as D | 3 |
| J | Circuit vent | J+M=7 | 40 | 2.5.7.1. 2.5.8.3.(4) | 1½ |
| K | Additional circuit vent | n/a | n/a | 2.5.7.1. 2.5.7.3.(1) | 1½ |
| L | Relief vent | n/a | n/a | 2.5.7.1. 2.5.7.3.(1) | 1½ |
| M | Branch vent | J+M=7 | 40 | 2.5.7.1. 2.5.7.2. | 1½ |
| N | Vent stack | Same as D=17 | 71 | Same as D | 3 |
| O | Stack vent | O+Q+T=5 | 66 | 2.5.7.1. 2.5.8.4. | 2 |
| P | Circuit vent | P=4 | 16 | 2.5.7.1. 2.5.8.3.(4) | 1½ |
| Q | Stack vent | Same as O=5 | 66 | 2.5.7.1. 2.5.8.4. | 2 |
| R | Stack vent | R+S+T=9 | 7.5 | 2.5.2.1.(1)(a) | 3 |
| S | Vent header | A+C+F+I+N+S+T=25 | 78.5 | 2.5.8.3.(3) | 3 |
| T | Vent header | Same as S=25 | 78.5 | 2.5.8.3.(3) | 3 |
| U | Individual vent | n/a | n/a | 2.5.7.1. | 1¼ |
| V | Branch vent | U+V+W=11 | 2 | 2.5.7.1. 2.5.7.2. | 1¼ |
| W | Branch vent | Same as V=11 | 3 | 2.5.7.1. 2.5.7.2. | 1¼ |
| X | Stack vent | X+Y=3 | 4 | 2.5.7.1. 2.5.8.4. | 1¼ |
| Y | Stack vent | Same as X=3 | 4 | 2.5.7.1. 2.5.8.4. | 1¼ |
| Notes to Table A-2.5.8.: | |
|
|
|
| (1) | The letters in columns 1 and 3 correspond to the letters in Figure A-2.5.8. |
A-2.5.8.1.(2) Sizing of Wet Vent Systems
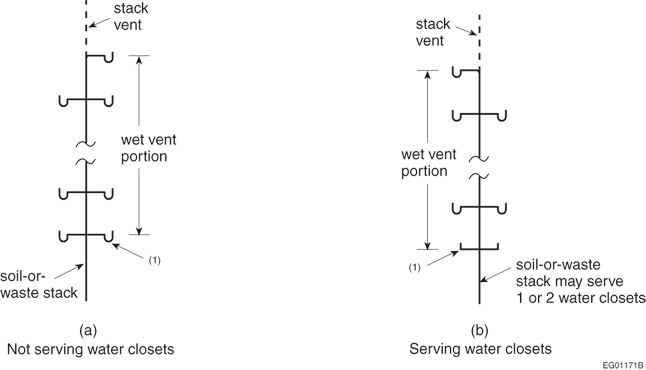
Figure A-2.5.8.1.(2)
Sizing of Wet Vent Systems
Notes to Figure A-2.5.8.1.(2):
|
|
|
| (1) |
These two fixtures are not included when determining the size of the wet
vent portion using Table 2.5.8.1. |
A-2.5.8.3. and 2.5.8.4. Lengths to be Considered When Sizing Vent Pipes
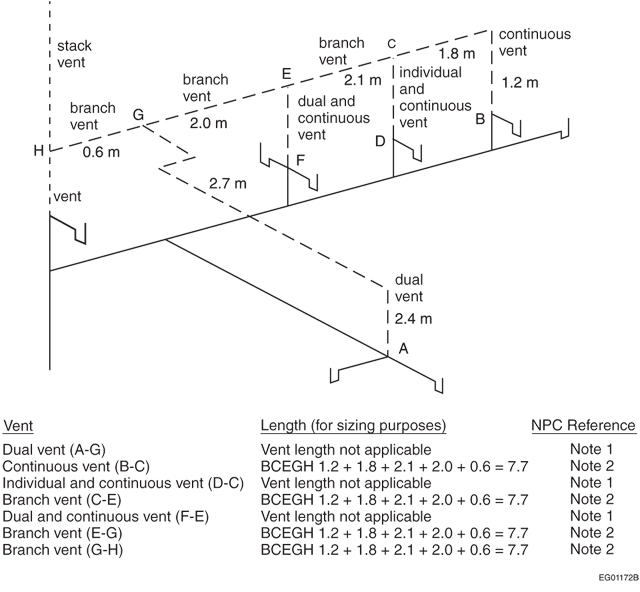
Figure A-2.5.8.3. and 2.5.8.4.-A
Lengths to be Considered When Sizing Vent Pipes
Notes to Figure A-2.5.8.3. and 2.5.8.4.-A:
|
|
|
| (1) |
See Article 2.5.8.2. |
| (2) |
See Article 2.5.8.3. |

Figure A-2.5.8.3. and 2.5.8.4.-B
Lengths to be Considered When Sizing Vent Pipes
Notes to Figure A-2.5.8.3. and 2.5.8.4.-B:
|
|
|
| (1) |
See Sentence 2.5.8.4.(2).
|
| (2) |
See Sentence 2.5.8.3.(3).
|
A-2.6.1.3.(5) Shut-off Valves
Where multiple risers convey the water supply to dwelling units,
each dwelling unit's water distribution system shall be provided with
a shut-off valve located immediately where the water piping enters
the suite so as to isolate the fixtures as well as the water distribution
piping serving the dwelling unit's fixtures. Fixture stopcocks or
shut-off valves located immediately adjacent to a fixture may not
be adequate to protect the water distribution piping. Where a dwelling
unit is served by a single shut-off valve on the water supply, additional
shut-off valves may be required to achieve compliance with Sentences 2.6.1.3.(4) and (7).
A-2.6.1.7.(5) Relief Valves
If
the discharge piping is longer than 2 m or more than
two 90° elbows are used, the valve manufacturer's installation
instructions should be followed to ensure that the piping does not
affect the relief valves' discharge capacity.
A-2.6.1.9.(1) Water Hammer Prevention
Water hammer is a buildup of pressure in a length of horizontal
or vertical pipe that occurs when a valve or faucet is closed suddenly.
The longer the pipe and the greater the water velocity, the greater
the pressure exerted on the pipe, which can be many times the normal
static water pressure and be sufficient to damage the piping system.
Since air chambers made from a piece of vertical pipe do not provide
acceptable protection, pre-manufactured water hammer arresters are
required to address this potential problem. Water hammer arresters
need not be installed at every valve or faucet, nor in every piping
system.
A-2.6.1.11.(1) Thermal Expansion
To accommodate the increase in pressure caused by thermal expansion within a
closed water distribution system, one of the following should be installed:
- a suitably sized diaphragm expansion tank designed for use within a potable water system,
- an auxiliary thermal expansion relief valve (T.E.R. valve)
conforming to CSA B125.3, “Plumbing Fittings,” set at a pressure of 550 kPa or less and designed for repeated use, or
- other means acceptable to the authority having jurisdiction.
A-2.6.1.12.(1) Service Water HeatersStoring hot water at temperatures below 60°C in the hot water tank or in the
delivery system may lead to the growth of legionella bacteria. Contemporary electric
water heater tanks experience temperature stratification and thus tend to have
legionella bacteria in the lower parts of the tank. Article 2.6.1.12. specifies a thermostat setting of 60°C, which addresses the concern over the growth
of legionella bacteria in electric hot water storage tanks and is enforceable
without introducing unnecessary complications. The growth of legionella bacteria is
not a concern for other types of water heaters with different designs that use
different fuels.
Electrically heated water heaters are shipped with the thermostat set at
60°C. Article 2.6.1.12. is included in Book II (Plumbing Systems) of this Code to formalize this de facto temperature setting as
a
requirement. The thermostats have graduated temperature markings to allow such a
setting, which is not the case with gas- or oil-heated water heaters.
A-2.6.2.1.(3) Backflow Preventers
CSA B64.10.1, “Maintenance and Field Testing of Backflow Preventers,”
is considered to represent good practice as regards procedures for the maintenance
and field testing of backflow preventers.
A-2.6.2.4.(2) Backflow from Fire Protection Systems
The following document is considered to be good engineering practice when
selecting a backflow preventer for installation on a fire protection system:
AWWA M14, “Recommended Practice for Backflow Prevention and Cross-Connection Control.”
| Table A-2.6.2.4.(2) Selection Guide for Backflow Prevention Devices on Fire Sprinkler and Standpipe Systems Forming part of Sentence 2.6.2.4.(2) | |||||
| CSA Standard Number |
Type of Device(1) | Systems Made with Potable Water System Materials | Systems Not Made with Potable Water System Materials | ||
| Minor Hazard — Residential Partial Flow-Through System | Minor Hazard — Class 1 System | Moderate Hazard — Class 1, 2, 3 and 6 Systems | Severe Hazard — Any Class of System in which Antifreeze or Other Additives Are Used | ||
| CSA B64.6.1 | DuCF | P | NP | NP | NP |
| CSA B64.9 | SCVAF | P | P | NP | NP |
| CSA B64.5.1 | DCVAF | P | P | P | NP |
| CSA B64.4.1 | RPF | P | P | P | P |
| NP = Not permitted P = Permitted | |||||
| Notes to Table A-2.6.2.4.(2): | |
|
|
|
| (1) | The “F” indicates that the product is only recommended for use on fire sprinkler and standpipe systems. |
A-2.6.2.4.(3) Fire Department Pumper Connection and Backflow Protection
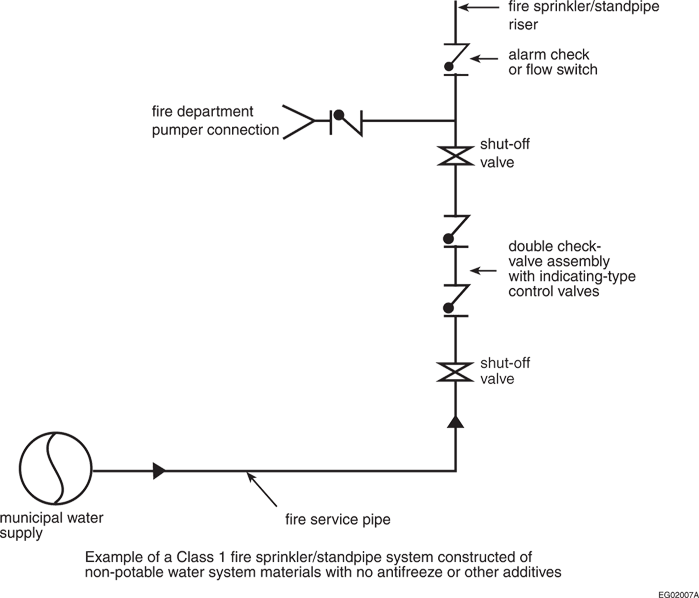
Figure A-2.6.2.4.(3)
Fire Department Pumper Connection and Backflow Protection
A-2.6.2.6.(1) Locations Requiring Premise Isolation
The following list is a guide to locations where premise isolation
may be required:
- hospital buildings with operating, mortuary or laboratory facilities
- radioactive material processing plants
- petroleum processing facilities
- premises where inspection is restricted
- sewage treatment plants
- commercial laundries (excluding laundromats)
- plating or chemical plants
- docks and dockside facilities
- food and beverage processing plants
- steam plants
- trackside facilities for trains
An assessment of the hazard must be carried out to determine
the need, if any, for a backflow prevention device.
A-2.6.2.9.(2) Installation of Air Gaps
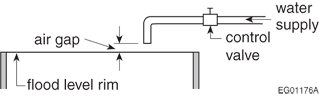
Figure A-2.6.2.9.(2)
Installation of Air Gaps
A-2.6.2.10.(2) Installation of Atmospheric Vacuum Breakers
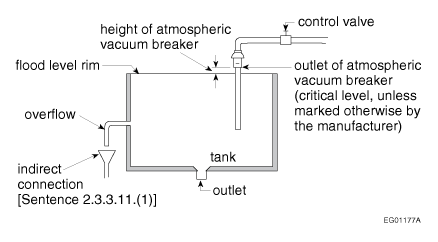
Figure A-2.6.2.10.(2)
Installation of Atmospheric Vacuum Breakers
A-2.6.3. Water Systems
This Subsection
contains performance requirements for water systems. Two widely used
references for the design of water systems are:
- NIST Building Materials and Structures Report BMS-79, “Water-Distributing Systems for Buildings,” United States Department of Commerce, National Bureau of Standards, Washington, D.C., and
- McGraw-Hill 2006, “International Plumbing Codes Handbook,” edited by V.T. Manas, McGraw-Hill Book Company, New York, U.S.A.
A-2.6.3.1. Water Quality
Water destined for use as potable water can originate from a variety of sources that
are
generally classified as surface waters or well waters, such as lakes, rivers, streams
and
aquifers. In some localities, there may be seasonal variations in the water supply,
and surface
and well waters may be blended at times.
Water composition is the primary consideration in determining the cause of corrosion
in
potable water systems. If the water has corrosive characteristics, water treatment
may be
necessary to control its corrosiveness: this may be as straightforward as adjusting
the pH of
the water at the treatment plant, or it may involve more extensive corrosion-control
treatment
methods. Water purveyors normally consult treatment specialists to develop methods
suitable for
specific conditions. The treatment of water from private wells may also require expert
consultation.
The past performance of plumbing materials and products in different localities often
provides insight into what can be expected with new installations. In areas where
water-related
corrosion is known to occur, adjustment of water chemistry may be sufficient or it
may be
necessary to select alternative piping and fitting materials or more robust products.
It is important to note that not all corrosion can be attributed to water conditions:
the
improper design and installation of potable water systems may result in erosion corrosion,
galvanic corrosion, fatigue cracking, and so forth.
A-2.6.3.1.(2) Potable Water Systems
The design procedures contained in the following documents are considered good engineering
practice in the field of potable water systems:
- ASHRAE 2011, “ASHRAE Handbook - HVAC Applications,” chapter on Service Water Heating,
- ASHRAE 2009, “ASHRAE Handbook of Fundamentals,” chapter on Pipe Sizing,
- ASPE 2005, “ASPE Plumbing Engineering Design Handbook,” chapter on Cold Water Systems, and
- ASPE 2005, “ASPE Plumbing Engineering Design Handbook,” chapter on Domestic Water Heating Systems.
Alternatively, the following methods, which apply to both public and private water
supplies, may be used in determining the size of each section of the water system
using Table A-2.6.3.1.(2)A (Small Commercial Building Method) and Table A-2.6.3.1.(2)F (Average Pressure Loss Method). Where these methods are considered an alternative to a detailed engineering design method, the hydraulic loads shall be the sum of the
total fixture units given in Tables 2.6.3.2.A, B, C and D.
Method for Small Commercial Buildings
Information required if using this method:
- The developed length:
- from the property line or private water supply system when located outside the building to the water service entry point to the building, and
- from the water service entry point to the building to the most remote water outlet.
- Minimum static pressure:
- the minimum static pressure available at the property line or other water source (private water supply system), or
- where there is a wide fluctuation of pressure in the main throughout the day, the minimum static pressure available.
- Pressure losses:
- losses for meters, pressure-reducing valves, backflow preventers, water treatment systems, and any other devices, and
- losses or gains due to changes in elevation.
- The number of fixture units (FU) as determined by using the sum of the total values given in Tables 2.6.3.2.A, B, C and D.
- The maximum velocities permitted in accordance with the manufacturer’s recommendations for the pipe and fittings chosen for the installation.
Note that a private water supply system must be capable of meeting the demands of
the water distribution system.
Pipe Sizing Procedures
(see Figure A-2.6.3.1.(2)-A)Step 1: Water Service Piping (see Table A-2.6.3.1.(2)B)
- Obtain the total fixture units required for the installation using the sum of the total values given in Tables 2.6.3.2.A, B, C and D and consider all other demands on the water supply.
- Determine the minimum static pressure available at the property line or private water supply system and consider all pressure losses for the water service.
- Select the pressure range group in Table A-2.6.3.1.(2)A that is consistent with the minimum static pressure available including any other losses.
- Select the length column in Table A-2.6.3.1.(2)A that is equal to or greater than the developed length from the property line or private water supply system to the water service entry point to the building.
- In that column, find the fixture unit value that is equal to or greater than the fixture unit demand for the installation and follow the row back to the first column to locate the water service pipe size.
- To establish the adjusted static pressure available where the water service enters the building for sizing the water distribution system, subtract the actual static pressure losses for the water service from the minimum static pressure available at the property line.
- The adjusted static pressure available where a private water supply system is installed should be the static pressure available from such a system at the entry to the building.
Step 2: Hot Water Piping (see Table A-2.6.3.1.(2)C)
- Start with the most remote outlet in the most distant occupancy that requires hot water.
- Use the sum of the total fixture unit values given in Tables 2.6.3.2.A, B, C and 2.6.3.2.D and work back toward the service water heater, adding in the fixture unit values as they occur.
- Select the pressure range group in Table A-2.6.3.1.(2)A that is consistent with the minimum static pressure available at the water service entry and any other losses (e.g. elevation or devices such as backflow preventers, etc.). Use this pressure range group for all portions (hot and cold) of the water distribution system.
- Select the length column that is equal to or greater than the developed length from the water service entry point to the building to the most remote outlet served with either hot or cold water.
- In that column, find the fixture unit value that is equal to or greater than the fixture unit demand at each pipe and follow the row back to the second column to locate the water distribution system pipe size.
Step 3: Cold Water Piping (see Table A-2.6.3.1.(2)D)
- Start with the most remote outlet on the cold water piping using the established total developed length column and pressure range group in Table A-2.6.3.1.(2)A and work through Steps 2(c), (d) and (e) for hot water piping.
- Use the sum of the total fixture unit values given in Tables 2.6.3.2.A, B, C and 2.6.3.2.D and work back toward the water service entry.
- Where the service water heater distribution pipe occurs, add in the fixture unit demand of the fixtures served only with hot water and those that have not yet been added in as served to the cold water side of the most remote fixtures requiring both a hot and cold water supply.
- Continue by sizing the cold water main between the service water heater distribution pipe and the water service entry.
- Add in the fixtures served with cold water only from the main within the most remote occupancy as they occur and all common distribution piping serving hot and cold water to other occupancies as they occur.
- Complete by sizing all distribution piping served by the main within the most remote occupancy and then the other occupancies not yet sized using the previously established total developed length and pressure range group in Table A-2.6.3.1.(2)A.
| Table A-2.6.3.1.(2)A Pipe Sizes for Water Systems Based on Number of Fixture Units Served Using the Small Commercial Method(1) | ||||||||||||||||
| Water Service Pipe, inches | Water Distribution System, inches | Maximum Allowable Length, m | ||||||||||||||
| 12 | 18 | 24 | 30 | 46 | 61 | 76 | 91 | 122 | 152 | 183 | 213 | 244 | 274 | 305 | ||
| Number of Fixture Units Served | ||||||||||||||||
| Flow Velocity, m/s | 3.0 | 2.4 | 1.5 | |||||||||||||
| Pressure Range 200 to 310 kPa | ||||||||||||||||
| ¾ | ½ | 6 | 5 | 4 | 3 | 2 | 1 | 1 | 1 | 0 | 0 | 0 | 0 | 0 | 0 | 0 |
| ¾ | ⅝ | 12 | 10 | 9 | 7 | 5 | 3 | 3 | 3 | 2 | 2 | 1 | 1 | 1 | 1 | 0 |
| ¾ | ¾ | 18 | 16 | 14 | 12 | 9 | 6 | 5 | 5 | 4 | 4 | 3 | 2 | 2 | 2 | 1 |
| 1 | 1 | 36 | 31 | 27 | 25 | 20 | 17 | 15 | 13 | 12 | 10 | 8 | 6 | 6 | 6 | 6 |
| 1½ | 1¼ | 83 | 68 | 57 | 48 | 38 | 32 | 28 | 25 | 21 | 18 | 15 | 12 | 12 | 11 | 11 |
| 1½ | 1½ | 151 | 124 | 105 | 91 | 70 | 57 | 49 | 45 | 36 | 31 | 26 | 23 | 21 | 20 | 20 |
| 2 | 1½ | 151 | 151 | 132 | 110 | 80 | 64 | 53 | 46 | 38 | 32 | 27 | 23 | 21 | 20 | 20 |
| 2 | 2 | 359 | 329 | 292 | 265 | 217 | 185 | 164 | 147 | 124 | 96 | 70 | 61 | 57 | 54 | 51 |
| 2½ | 2½ | 445 | 418 | 390 | 370 | 330 | 300 | 280 | 265 | 240 | 220 | 198 | 175 | 158 | 143 | 133 |
| Pressure Range 311 to 413 kPa | ||||||||||||||||
| ¾ | ½ | 8 | 7 | 6 | 5 | 4 | 3 | 2 | 2 | 1 | 1 | 1 | 0 | 0 | 0 | 0 |
| ¾ | ⅝ | 13 | 13 | 12 | 11 | 9 | 7 | 5 | 5 | 3 | 3 | 2 | 2 | 1 | 1 | 1 |
| ¾ | ¾ | 21 | 21 | 19 | 17 | 14 | 11 | 9 | 8 | 6 | 5 | 4 | 4 | 3 | 3 | 3 |
| 1 | 1 | 42 | 42 | 41 | 36 | 30 | 25 | 23 | 20 | 18 | 15 | 12 | 10 | 9 | 8 | 8 |
| 1½ | 1¼ | 83 | 83 | 83 | 83 | 66 | 52 | 44 | 39 | 33 | 29 | 24 | 20 | 19 | 17 | 16 |
| 1½ | 1½ | 151 | 151 | 151 | 151 | 128 | 105 | 90 | 78 | 62 | 52 | 42 | 38 | 35 | 32 | 30 |
| 2 | 1½ | 151 | 151 | 151 | 151 | 150 | 117 | 98 | 84 | 67 | 55 | 42 | 38 | 35 | 32 | 30 |
| 2 | 2 | 359 | 359 | 359 | 359 | 359 | 318 | 280 | 250 | 205 | 165 | 142 | 123 | 110 | 102 | 94 |
| 2½ | 2½ | 611 | 611 | 610 | 580 | 535 | 500 | 470 | 440 | 400 | 365 | 335 | 315 | 285 | 267 | 250 |
| Pressure Over 413 kPa | ||||||||||||||||
| ¾ | ½ | 8 | 8 | 7 | 6 | 5 | 4 | 3 | 3 | 2 | 1 | 1 | 1 | 1 | 1 | 0 |
| ¾ | ⅝ | 13 | 13 | 13 | 13 | 11 | 8 | 7 | 6 | 5 | 4 | 3 | 3 | 3 | 2 | 2 |
| ¾ | ¾ | 21 | 21 | 21 | 21 | 17 | 13 | 11 | 10 | 8 | 7 | 6 | 6 | 5 | 4 | 4 |
| 1 | 1 | 42 | 42 | 42 | 42 | 38 | 32 | 29 | 26 | 22 | 18 | 14 | 13 | 12 | 12 | 11 |
| 1½ | 1¼ | 83 | 83 | 83 | 83 | 83 | 74 | 62 | 54 | 43 | 34 | 26 | 25 | 23 | 22 | 21 |
| 1½ | 1½ | 151 | 151 | 151 | 151 | 151 | 151 | 130 | 113 | 88 | 73 | 51 | 51 | 46 | 43 | 40 |
| 2 | 1½ | 151 | 151 | 151 | 151 | 151 | 151 | 142 | 122 | 98 | 82 | 64 | 51 | 46 | 43 | 40 |
| 2 | 2 | 359 | 359 | 359 | 359 | 359 | 359 | 359 | 340 | 288 | 245 | 204 | 172 | 153 | 141 | 129 |
| 2½ | 2½ | 611 | 611 | 611 | 611 | 611 | 611 | 610 | 570 | 510 | 460 | 430 | 404 | 380 | 356 | 329 |
| Notes to Table A-2.6.3.1.(2)A: | |
|
|
|
| (1) | Where total fixture unit values exceed those given in this Table, the system must be designed according to a detailed engineering design method. |
| Table A-2.6.3.1.(2)B Sizing of Water Service Pipe Using Figure A-2.6.3.1.(2)-A and Table A-2.6.3.1.(2)A.(1) | ||
| Fixture Units | Pipe Size, inches | |
| Total demand from Table A-2.6.3.1.(2)E | 210.8 | – |
| Add in fixture units for fire sprinkler system, irrigation system and any other demands on water service | n/a in this example | – |
| Total demand in this example | 210.8 | 2 |
| Notes to Table A-2.6.3.1.(2)B: | |
|
|
|
| (1) | Based on 30 m developed length and minimum static pressure at property line of 565 kPa. |
| Table A-2.6.3.1.(2)C Sizing of Hot Water System Using Figure A-2.6.3.1.(2)-A and Table A-2.6.3.1.(2)A. with Pressure Drop(1) | ||
| Pipe Number | Fixture Units | Pipe Size, inches |
| 1 | 8 | ¾ |
| 2 | 11 | ¾ |
| 3 | 15 | 1 |
| 4 | 6 | ⅝ |
| 5 | 21 | 1 |
| Total Fixture Units | 21 | 1 |
| Notes to Table A-2.6.3.1.(2)C: | |
|
|
|
| (1) | Based on 76 m developed length and adjusted static pressure at building entry of 540 kPa. |
| Table A-2.6.3.1.(2)D Sizing of Cold Water System Using Figure A-2.6.3.1.(2)-A and Table A-2.6.3.1.(2)A.(1) | ||
| Pipe Letter | Cold Water, fixture units | Pipe Size, inches |
| A | 11 | ¾ |
| B | 21 | 1 |
| C | 21 | 1 |
| D | 29.8 | 1¼ |
| E | 20 | 1 |
| F | 49.8 | 1¼ |
| G | 20 | 1 |
| H | 69.8 | 1½ |
| I | 20 | 1 |
| J | 89.8 | 1½ |
| K | 20 | 1 |
| L | 109.8 | 1½ |
| M | 60 | 1¼ |
| N | 169.8 | 2 |
| O | 20 | 1 |
| P | 189.8 | 2 |
| Q | 21 | 1 |
| R | 210.8 | 2 |
| Total Fixture Units | 210.8 | 2 |
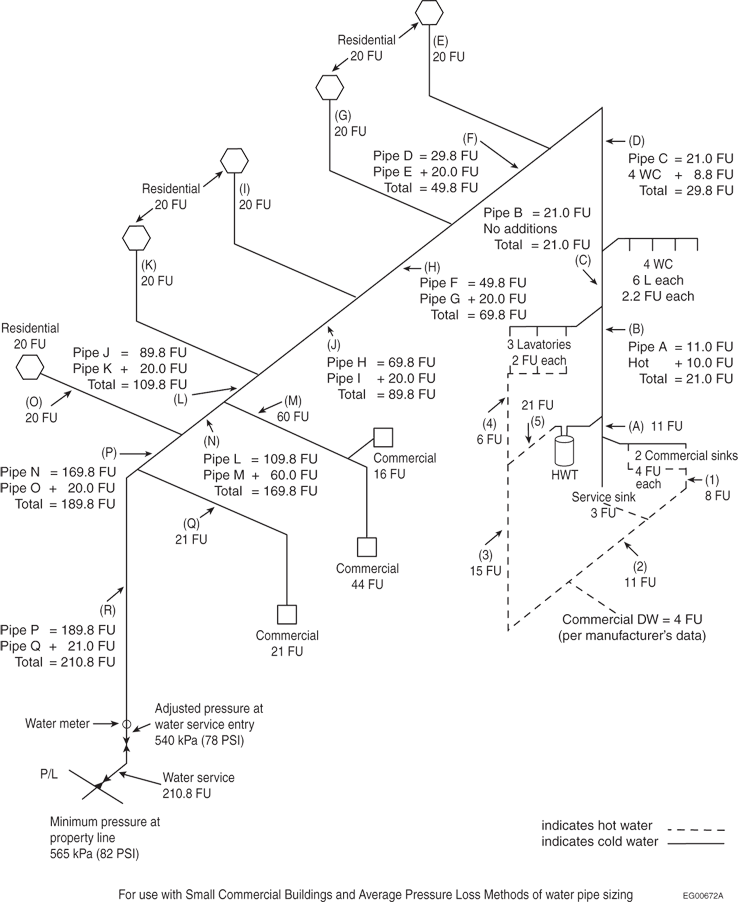
Figure A-2.6.3.1.(2)-A
Example of Commercial and Residential Development to be Used with Water Pipe Sizing
Methods
Notes to Figure A-2.6.3.1.(2)-A:
| Table A-2.6.3.1.(2)E Fixture Units Summary for Figure A-2.6.3.1.(2)-A Using Tables 2.6.3.2.A., B., C. and D. |
|||
| Fixtures | Quantity | 100% Fixture Unit Values | Total Demand (Quantity x Fixture Unit Values) |
| Lavatory, 8.3 LPM or less | 3 | 2 | 6 |
| Commercial sink | 2 | 4 | 8 |
| Service sink | 1 | 3 | 3 |
| W.C., 6 LPF or less | 4 | 2.2 | 8.8 |
| Other | – | – | – |
| Commercial dishwasher | 1 | 4 | 4 |
| Commercial occupancy | 1 | 16 | 16 |
| Commercial occupancy | 1 | 44 | 44 |
| Commercial occupancy | 1 | 21 | 21 |
| Residential occupancy | 5 | 20 | 100 |
| Total Fixture Units | 210.8 | ||
Average Pressure Loss Method
Information required if using this method:
- The developed length:
- from the property line or private water system when located outside the building to the water service entry point to the building, and
- from the building entry of the water service to the most remote water outlet.
- Minimum static pressure:
- the minimum static pressure available at the property line or other water source (private water supply system), or
- where there is a wide fluctuation of pressure in the main throughout the day, the minimum static pressure available.
- Pressure losses:
- losses for meters, pressure-reducing valves, backflow preventers, water treatment systems, and any other devices, and
- losses or gains due to changes in elevation.
- The number of fixture units as determined by using the sum of the total values given in Tables 2.6.3.2.A, B, C and D.
- The maximum velocities permitted in accordance with the manufacturer’s recommendations for the pipe and fittings chosen for the installation.
Note: The private water supply system must be capable of meeting the demands of the
water distribution system.
To use this method, calculate the pressure available for friction loss which must
be 2.6 kPa per metre or more; if it is less than that, the system must be designed according
to a detailed engineering design method.
Calculating Pressure Available for Friction Loss
(see Figure A-2.6.3.1.(2)-A)- Obtain the water service size, including pressure losses, and the design of the private water supply system if it is separate from the water distribution system.
- To calculate the total equivalent length for the water distribution system, determine
the developed length from the water service entry point to the building to the most
remote water outlet, and
- where fitting inside diameter dimensions are at least equal to the pipe size, multiply the developed length by 1.5 to allow for friction losses, and
- where insert fittings are used, apply additional losses in accordance with the fitting manufacturer’s data.
- To determine the adjusted pressure available at the water service entry for sizing the water distribution system, deduct the pressure losses for the water service from the minimum static pressure available at the property line or private water source.
- To obtain the pressure available for friction loss, use the minimum adjusted static pressure available at the water service entry and deduct the minimum operating pressure necessary at the most remote water outlet, and losses for meters, pressure-reducing valves, backflow preventers, water treatment systems, and any other devices. Include pressure losses or gains due to changes in elevation between the water service entry and the most remote water outlet.
- Divide the static pressure available for friction loss by the total equivalent length to obtain the pressure available for friction loss per metre.
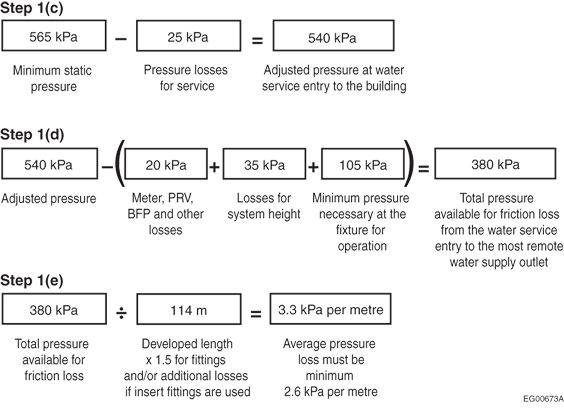
Figure A-2.6.3.1.(2)-A
Determination of Pressure Available for Friction Loss
Pipe Sizing Procedures
(see Figure A-2.6.3.1.(2)-A)Step 1: Water Service Piping (see Table A-2.6.3.1.(2)G)
- Obtain the total fixture units required for the installation using the sum of the total values given in Tables 2.6.3.2.A, B, C and D and consider all other demands on the water supply.
- Select the water service pipe size from Table A-2.6.3.1.(2)F using the velocity column that is consistent with the pipe and fittings chosen for the installation.
- Determine the minimum static pressure available at the property line or private water source and consider all pressure losses for the water service.
- To establish the adjusted static pressure available where the water service enters the building for sizing the water distribution system, subtract the actual static pressure losses for the water service from the minimum static pressure available at the property line.
- The adjusted static pressure available where a private water supply system is installed should be the static pressure available from such a system at the entry to the building.
Step 2: Hot Water Piping (see Table A-2.6.3.1.(2)H)
- Start with the most remote outlet in the most distant occupancy that requires hot water.
- Use the sum of the total fixture unit values given in Tables 2.6.3.2.A, B, C and 2.6.3.2.D and work back toward the service water heater, adding in the fixture unit values as they occur.
- Size the hot water system according to Table A-2.6.3.1.(2)F using the velocity column that is consistent with the manufacturer’s requirements for the pipe and fittings chosen when serving a hot water system.
Step 3: Cold Water Piping (see Table A-2.6.3.1.(2)I)
- Start with the most remote outlet requiring cold water in the most distant occupancy and working back towards the water service entry adding in the fixture unit values as they occur.
- Obtain the fixture units using the sum of the total fixture unit values given in Tables 2.6.3.2.A, B, C and D.
- Size the cold water system to Table A-2.6.3.1.(2)F using the velocity column that is consistent with the manufacturer’s requirements for the pipe and fittings chosen when serving a cold water system.
- Where the service water heater distribution pipe occurs, add in the fixture unit demand of the fixtures served with only hot water and those that have not yet been added in as served to the cold water side of the most remote fixtures requiring both hot and cold water supply.
- Continue by sizing the cold water main between the service water heater distribution pipe and the water service entry.
- Add in the fixtures served with only cold water from the main within the most remote occupancy as they occur and then all common distribution piping serving hot and cold water to other occupancies as they occur.
- Complete by sizing all distribution piping served by the main in the most remote occupancy and then the other occupancies not yet sized using Table A-2.6.3.1.(2)F.
| Table A-2.6.3.1.(2)F Pipe Sizes for Water Systems Based on Number of Fixture Units Served Using the Average Pressure Loss Method |
||||||||
| Pipe Size, inches | Water Velocity | |||||||
| 3.0 m/s (10 ft/s) | 2.4 m/s (8 ft/s) | 1.5 m/s (5 ft/s) | 1.2 m/s (4 ft/s) | |||||
| Flow and Fixture Units Served | ||||||||
| L/s | Fixture Units | L/s | Fixture Units | L/s | Fixture Units | L/s | Fixture Units | |
| ½ | 0.46 | 8 | 0.36 | 7 | 0.23 | 3.5 | 0.18 | 2.5 |
| ⅝ | 0.68 | 13 | 0.54 | 11 | 0.34 | 6.5 | 0.27 | 4.5 |
| ¾ | 0.95 | 21 | 0.77 | 17 | 0.48 | 9 | 0.38 | 7.5 |
| 1 | 1.62 | 42 | 1.26 | 30 | 0.81 | 18 | 0.65 | 14 |
| 1¼ | 2.47 | 83 | 1.8 | 54 | 1.24 | 29 | 0.99 | 22 |
| 1½ | 3.5 | 146 | 2.8 | 102 | 1.75 | 46 | 1.4 | 34 |
| 2 | 6.08 | 337 | 4.92 | 265 | 3.04 | 120 | 2.43 | 81 |
| 2½ | 9.39 | 692 | 7.89 | 500 | 4.69 | 245 | 3.75 | 170 |
| 3 | 13.23 | 1 018 | 10.73 | 750 | 6.7 | 400 | 5.36 | 295 |
| 4 | 23.94 | 2 480 | 18.9 | 1 800 | 11.78 | 850 | 9.42 | 600 |
| 5 | 37 | 4 400 | 29 | 3 350 | 18.35 | 1 625 | 14.68 | 1 125 |
| 6 | 52.1 | 6 600 | 42 | 4 800 | 26.38 | 2 875 | 21.11 | 2 125 |
| Table A-2.6.3.1.(2)G Sizing of Water Service Pipe Using Figure A-2.6.3.1.(2)-A and Table A-2.6.3.1.(2)F.(1) | ||
| Fixture Units | Pipe Size, inches | |
| Total demand from Table A-2.6.3.1.(2)E | 210.8 | – |
| Add in fixture units for fire sprinkler system, irrigation system and any other demands on water service | n/a in this example | – |
| Total demand in this example | 210.8 | 2 |
| Notes to Table A-2.6.3.1.(2)G: | |
|
|
|
| (1) | Based on 30 m developed length and minimum static pressure at property line of 565 kPa. |
| Table A-2.6.3.1.(2)H Sizing of Hot Water System Using Figure A-2.6.3.1.(2)-A and Table A-2.6.3.1.(2)F. with Flow Velocity(1) | ||
| Pipe Number | Fixture Units | Pipe Size, inches |
| 1 | 8 | ¾ |
| 2 | 11 | 1 |
| 3 | 15 | 1 |
| 4 | 6 | ⅝ |
| 5 | 21 | 1¼ |
| Total Fixture Units | 21 | 1¼ |
| Notes to Table A-2.6.3.1.(2)H: | |
|
|
|
| (1) | Based on 1.5 m/s and adjusted static pressure at building entry of 540 kPa. |
| Table A-2.6.3.1.(2)I Sizing of Cold Water System Using Figure A-2.6.3.1.(2)-A and Table A-2.6.3.1.(2)F.(1) | ||
| Pipe Letter | Cold Water, fixture units | Pipe Size, inches |
| A | 11 | ⅝ |
| B | 21 | 1 |
| C | 21 | 1 |
| D | 29.8 | 1 |
| E | 20 | 1 |
| F | 49.8 | 1¼ |
| G | 20 | 1 |
| H | 69.8 | 1½ |
| I | 20 | 1 |
| J | 89.8 | 1½ |
| K | 20 | 1 |
| L | 109.8 | 2 |
| M | 60 | 1½ |
| N | 169.8 | 2 |
| O | 20 | 1 |
| P | 189.8 | 2 |
| Q | 21 | 1 |
| R | 210.8 | 2 |
| Total Fixture Units | 210.8 | 2 |
A-2.6.3.2.(4) Sizing for Flush Valves
Distribution piping and water mains serving flush valves may
be sized using the values assigned in Tables 2.6.3.2.B and C, beginning with the most remote flush valve on each section of distribution piping served by the water main.
A-2.6.3.4.(5) Sizing of Water Systems
Sentence 2.6.3.4.(5) and Table 2.6.3.4. present a simplified method of water system sizing, which is permitted in buildings containing one or two dwelling units or row houses with
separate water services.
Simplified Method
This sizing method may be used in the buildings noted, where:
- the total developed length from the property line to the most remote fixture is not more than 90 m, and
- the static pressure available at the water service entry to the building is not less than 200 kPa.
Where either the developed length is exceeded or the minimum static pressure
required is not known, a detailed engineering design method must be used to size
the water service piping. The design must ensure a minimum static pressure of
200 kPa is available at the water service entry to the
building.
Information required when using this method:
- The total number of fixture units (FU) as determined by using the sum of the total fixture unit values given in Tables 2.6.3.2.A, B, C and D.
- Where the water service also serves a fire sprinkler system, irrigation system, or any other system, these demands must be added to the water service sizing.
Pipe Sizing Procedures
Step 1: Water Service Pipe
- Obtain the total fixture units required for the installation using the sum of the total values given in Tables 2.6.3.2.A, B, C and D and consider all other demands on the water supply.
- Determine the water service pipe size using the water velocity column in Table 2.6.3.4. that is consistent with the pipe material chosen for the installation.
Step 2: Hot Water Piping
- Start with the most remote fixture requiring a supply of hot water and work back toward the service water heater, adding in the fixture unit loads as they occur.
- Determine the fixture units using the sum of the total fixture unit values given in Tables 2.6.3.2.A, B, C and D.
- Size the hot water system using the water velocity column in Table 2.6.3.4. that is consistent with the manufacturer’s recommendations for the pipe and fittings chosen when serving a hot water system.
Step 3: Cold Water Piping
- Start with the most remote fixture requiring a supply of cold water and work back toward the water service entry, adding in the fixture unit loads as they occur.
- Obtain the fixture units using the sum of the total fixture unit values given in Tables 2.6.3.2.A, B, C and D
- Size the cold water system using the water velocity column in Table 2.6.3.4. that is consistent with the manufacturer's recommendations for the pipe chosen when serving a cold water system.
- Where the service water heater distribution pipe occurs, add in the fixture unit demand of the fixtures served with only hot water and those that have not yet been added in as served to the cold water side of the fixtures requiring both a hot and cold water supply.
- Continue sizing the cold water main between the service water heater distribution pipe and the water service entry by adding all fixtures served with only a cold water supply as they occur.
- Complete by sizing all cold water distribution piping served by the main between the water heater distribution pipe and the water service entry.

Figure A-2.6.3.4.(5)-A
Determining the hydraulic needs of a fixture
Notes to Figure A-2.6.3.4.(5)-A:
| Table A-2.6.3.4.(5)A Fixture Units Summary Using Figure A-2.6.3.4.(5)-B and Tables 2.6.3.2.A., B., C. and D. |
|||
| Fixtures | Number of Fixtures | 100% Fixture Unit Values | Total Demand (Quantity x Fixture Unit Values) |
| Bathtub | 2 | 1.4 | 2.8 |
| Clothes washer | 2 | 1.4 | 2.8 |
| Dishwasher | 2 | 1.4 | 2.8 |
| Hose bibb | 1 | 2.5 | 2.5 |
| Lavatory, 8.3 LPM or less | 3 | 0.7 | 2.1 |
| Shower, 9.5 LPM or less | 1 | 1.4 | 1.4 |
| Sink, 8.3 LPM or less | 2 | 1.4 | 2.8 |
| W.C., 6 LPF or less | 3 | 2.2 | 6.6 |
| Other | |||
| Total Fixture Units | 23.8 | ||
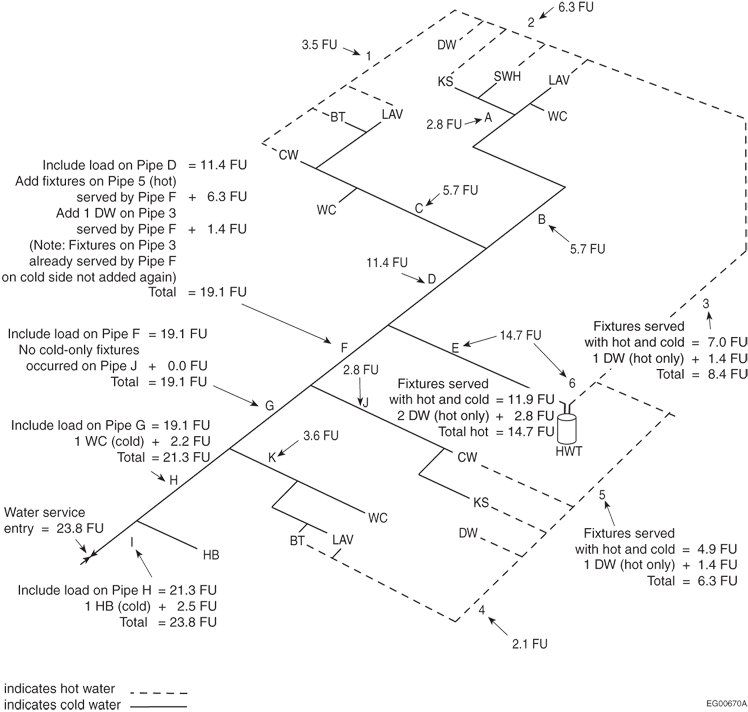
Figure A-2.6.3.4.(5)-B
Example of water pipe sizing for buildings containing one or two dwelling
units or row houses with separate water services
| Table A-2.6.3.4.(5)B Sizing of Water Service Pipe Using Figure A-2.6.3.4.(5)-B and Table 2.6.3.4. |
||||
| Fixture Units | Water Velocity, m/s | |||
| 3.0 | 2.4 | 1.5 | ||
| Pipe Size, inches | ||||
| Total fixture units | 23.8 | – | – | – |
| Fire sprinkler system | n/a | – | – | – |
| Irrigation system | n/a | – | – | – |
| Other | n/a | – | – | – |
| Total demand on water service | 23.8 | 1 | 1 | 1¼ |
| Table A-2.6.3.4.(5)C Sizing of Hot Water System Using Figure A-2.6.3.4.(5)-B and Table 2.6.3.4. |
||||
| Pipe Number | Hot
Water Fixture Units |
Water Velocity, m/s | ||
| 3.0 | 2.4 | 1.5 | ||
| Pipe Size, inches | ||||
| 1 | 3.5 | ½ | ½ | ½ |
| 2 | 6.3 | ½ | ½ | ¾ |
| 3 | 8.4 | ¾ | ¾ | ¾ |
| 4 | 2.1 | ½ | ½ | ½ |
| 5 | 6.3 | ½ | ½ | ¾ |
| 6 | 14.7 | ¾ | ¾ | 1 |
| Total Fixture Units | 14.7 | |||
| Table A-2.6.3.4.(5)D Sizing of Cold Water System Using Figure A-2.6.3.4.(5)-B and Table 2.6.3.4. |
||||
| Pipe Letter | Cold
Water Fixture Units |
Water Velocity, m/s | ||
| 3.0 | 2.4 | 1.5 | ||
| Pipe Size, inches | ||||
| A | 2.8 | ½ | ½ | ½ |
| B | 5.7 | ½ | ½ | ¾ |
| C | 5.7 | ½ | ½ | ¾ |
| D | 11.4 | ¾ | ¾ | 1 |
| E | 14.7 | ¾ | ¾ | 1 |
| F | 19.1 | ¾ | 1 | 1¼ |
| G | 19.1 | ¾ | 1 | 1¼ |
| H | 21.3 | 1 | 1 | 1¼ |
| I | 23.8 | 1 | 1 | 1¼ |
| J | 2.8 | ½ | ½ | ½ |
| K | 3.6 | ½ | ½ | ½ |
| Total Fixture Units | 23.8 | | ||
A-2.7.3.2.(1) Outlets from Non-Potable Water Systems
The location of outlets from non-potable water systems where they can be
discharged into a sink or lavatory (i.e. bathroom sink), a fixture into which an outlet from a potable water system is discharged, or a
fixture that is used for the preparation, handling or dispensing of food, drink or
products that are intended for human consumption, may have proven acceptable on the
basis of past performance in some localities such as rest stops, and its acceptance under this Code may be warranted.
(i.e. bathroom sink), a fixture into which an outlet from a potable water system is discharged, or a
fixture that is used for the preparation, handling or dispensing of food, drink or
products that are intended for human consumption, may have proven acceptable on the
basis of past performance in some localities such as rest stops, and its acceptance under this Code may be warranted. Subclause 2.7.3.2.(1)(b) would permit non potable water to be used to supply water closets or urinals provided the fixtures are not also connected to potable
water.
A-2.7.4.1. Non-potable Water System DesignThere is a growing interest in Canada in using available non-potable water
supplies in the place of potable ones for selected purposes such as flushing toilets
and irrigating lawns and gardens. Article 2.7.4.1. applies to non-potable water systems regardless of the origin of the water. The
non-potable water must meet applicable water quality standards as determined by an
authority having jurisdiction.
Non-potable water can vary greatly in quality and hazard level. The water from
sewage, storm water, clear-water waste or an auxiliary water supply that is not safe
for human consumption is included. Grey-water (which commonly refers to a subset of
sewage) discharges from the fixture outlet pipes of specific fixtures such as
laundry facilities, showers, baths and bathroom sinks. Typically neither the
discharge from sanitary units such as toilets, nor the discharge from kitchen sinks,
is included within the scope of the term grey-water.
Good engineering practice would dictate that non-potable water be of appropriate
quality for the end use. The Canadian Guidelines for
Domestic Reclaimed Water for Use in Toilet and Urinal Flushing, as
published by Health Canada, provides appropriate water quality values for those
uses.
Water quality values and monitoring requirements for reclaimed water are also
prescribed by a regulation made under the Environmental Management Act (EMA).
Reclaimed water is a subset of non-potable water, produced from larger volume
systems accepting domestic or municipal wastewater. Consequently, the monitoring
requirements may be more stringent than necessary for smaller applications, but the
water quality values may still be taken in isolation and used as a benchmark for
non-potable water systems designed to meet Article 2.7.4.1. to which the regulation under the EMA does not apply. The water quality values can include
biochemical oxygen demand (BOD5), turbidity (NTU) and fecal coliforms.
Note that the regulation under the EMA permits additional uses for non-potable
water under certain conditions. It is not the intent of Section 2.7. to contradict the EMA or its regulations, but rather, to regulate the end use of
non-potable water systems where the EMA does not apply.